If you followed Mysterium this year, you know we put together an activity called “Escape the Age”. This idea came out of a much smaller scale activity from Mysterium 2013, in which attendees were put into a room that had been converted into an ‘age’ and had to find the linking book home. Both were, in part, inspired by so called “Escape the Room” games that exist both online and in the real world.
For 2015, we wanted to take the concept and throw a real budget at it to make something that could really react to the players and provide fun and useful feedback. It wasn’t perfect, it occasionally broke, and it was too hard to solve in the time allotted… but still, every single person who played told me that they had a ton of fun. The main thing that they asked was that we release the documentation online so that they could see how it all worked. So that’s what is happening here.
A small disclaimer before I start: most of this documentation was written weeks or months ago, and the game changed in various ways since then. As with all game design documents, it was obsolete the moment it was typed up. If you read through the documents, you will find discrepancies and errors. I have tried to make small annotations here and there, but for the most part they are as they were originally written.
Videos
Let’s start with a few videos:
The first one, above, is a walkthrough we did at the end of the weekend. It shows all of the various components of the game, along with explaining the basic puzzle solutions.
Next is a video of a team playing through on Friday afternoon.
Finally, one of the last teams to play (possibly the last), taken on Saturday evening.
Overview
The process of designing EtA (our shorthand for “Escape the Age”) began in January or February of 2015, when I reached out to various people that I thought might be interested in taking part. In particular, a fan named Tonbury had designed the 2013 game, and was eager to work on this one. We all batted around ideas now and then, but, as happens with volunteer organizations, nothing really got done. Around the beginning of June, I realized that I needed to apply some actual leadership to this thing if we wanted it to get done in time. From that point on, the team largely shrank down to be just Tonbury and me, with assistance from Riv and Belford in reviewing puzzle/world elements, and Odo helping me design some of the technical elements.
You can find a copy of our master design document, largely the same as what Tonbury first sent my way in June, at the top of this document.
I told Tonbury to assume we could do anything, and that we’d figure out the details later. This is great for getting ideas out there… it’s terrible for projects that have limited time and money. But somehow, we made it work.
His design called for 4 consoles: a ‘navigation’ console, a ‘viewer’ console, a ‘retrieval arm’ console, and a ‘power’ console that controlled which of the other 3 were active. It also called for a number of proximity sensors that were used in the puzzle of powering up each console. Finally, it called for a topographic map, and an extremely complex boardgame. All of this was said to be housed inside of a D’ni observation pod, similar to the ones from URU’s museum or from Todelmer’s tablet location.
The Consoles
If you scroll down in that design document, you will find a section titled “Electronics Parts List”. This, more or less, details the electronics used in each box. Electronics parts were sourced from a number of different online retailers, along with scrounging in my long neglected bins full of parts.
Each console (and a few other sensors) was controlled by an Arduino microcontroller. We used a combination of Arduino Duemilanoves, an Arduino Diecimila, an Arduino Mega, and a number of Arduino Pros, using a combination of older 168 chips and newer 328 chips. All but one was powered using USB cables (plugged into the wall or, in one case, a laptop). The last one was powered by a pack of four AA batteries.
As shown in the design doc, we used nRF24L01 wireless modules for communication, along with an Arduino library to turn them into a dynamic mesh network. This meant that, even if they were too far away to talk to the master Arduino (in the viewer console), they could find a nearby Arduino and route traffic through it. This was a concern because we didn’t know what kind of range we would have, given interference from other wireless signals or from bodies in the room. They ended up being extremely reliable, which was great to see, given how inexpensive they are.
If we ever do something like this again, I would like to do away with these modules and the use of Arduinos, and instead use something like the CHIP that was recently kickstarted, given that they are small, much more powerful, and have built in wifi/bluetooth functionality… all for $9. Given how far technology like the Arduino has come in just a few short years, I can only imagine where these devices will be in a year or two.
Now for some pictures:
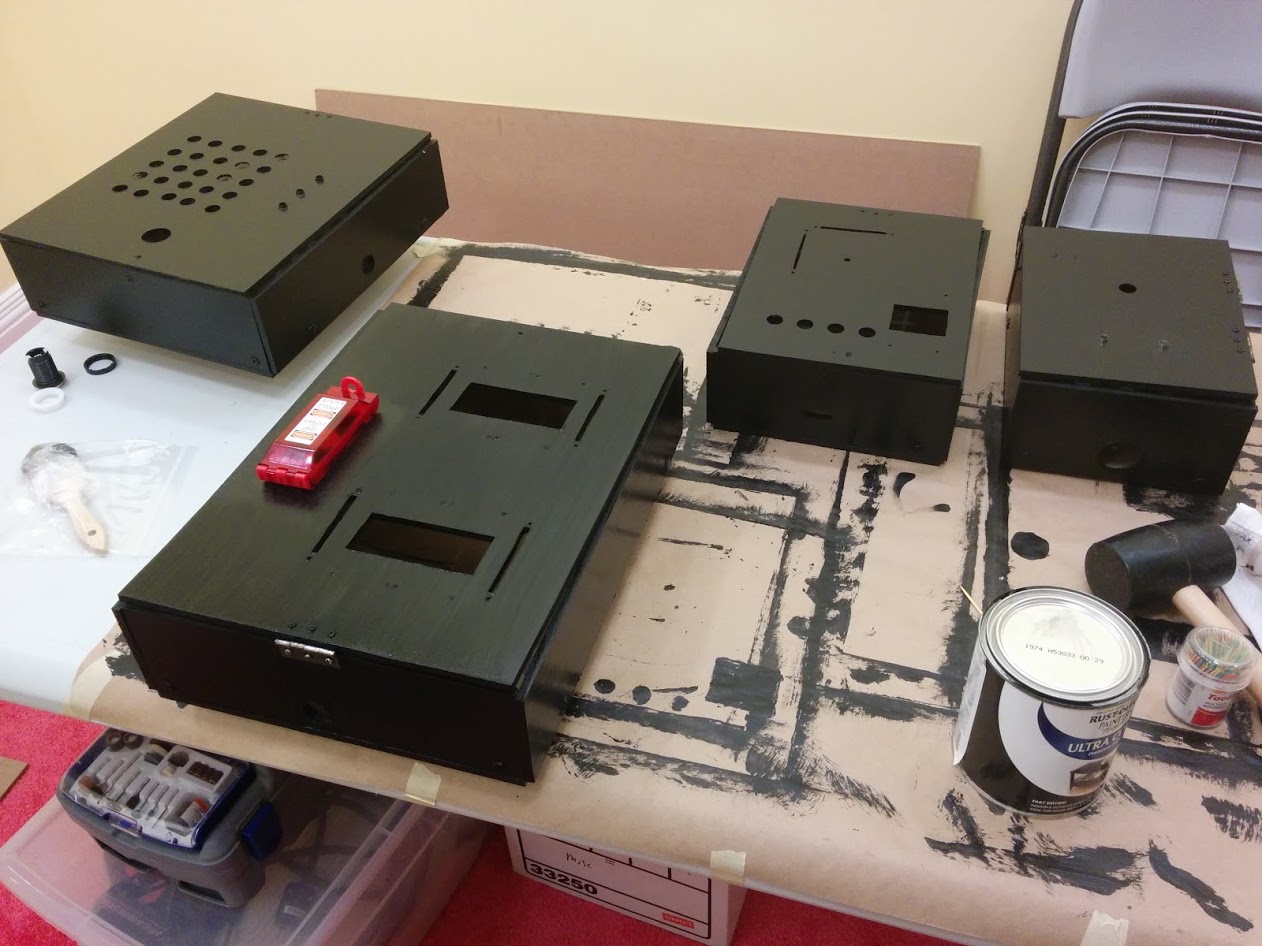
Above is a picture of the 4 consoles after a fresh coat of paint. Each console was made of 1/4″ MDF. They were painted with several coats of semi-gloss black enamel paint. I found that by always brushing in the same direction, and using a really cheap (<$1) brush, I could get a reasonable imitation of Ikea’s black ‘wood grain’ finish.
You may notice that the covers don’t really fit on the boxes. In the rush, I forgot the part where two opposite sides must be shortened by the thickness of the two other sides… oops. This was a wonderful example of “good, fast, cheap – pick two”.
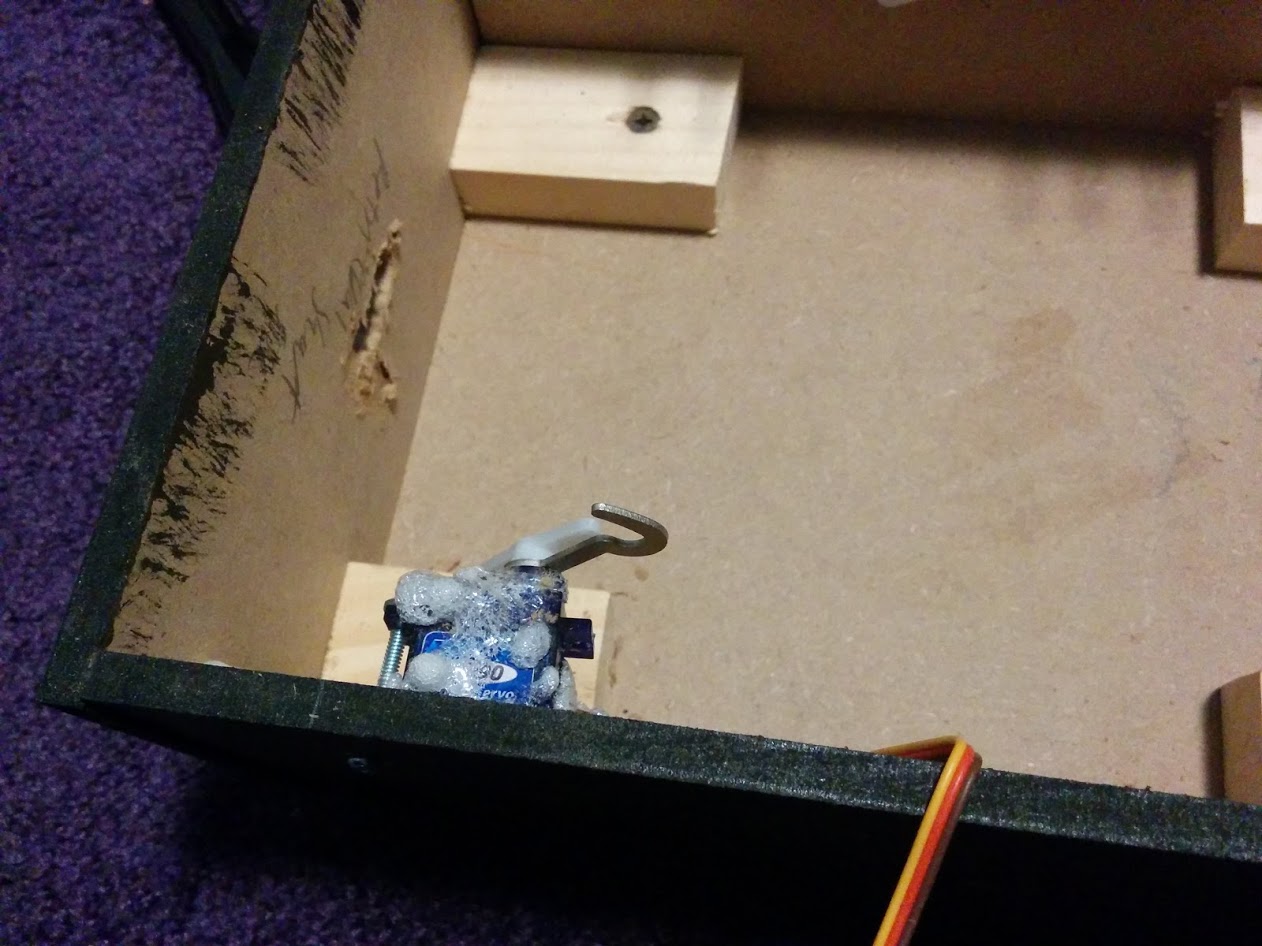
Here you can see the inside of the ‘retrieval arm console’. This servo was not really designed to be mounted from the bottom like this, and the control cable blocked a second screw from being used. The solution was to just pour a ton of glue on it. There is a hook attached to the servo that latches into a complimentary piece on the lid to serve as the locking mechanism. I would have preferred to use a linear actuator, but those are unreasonably expensive.
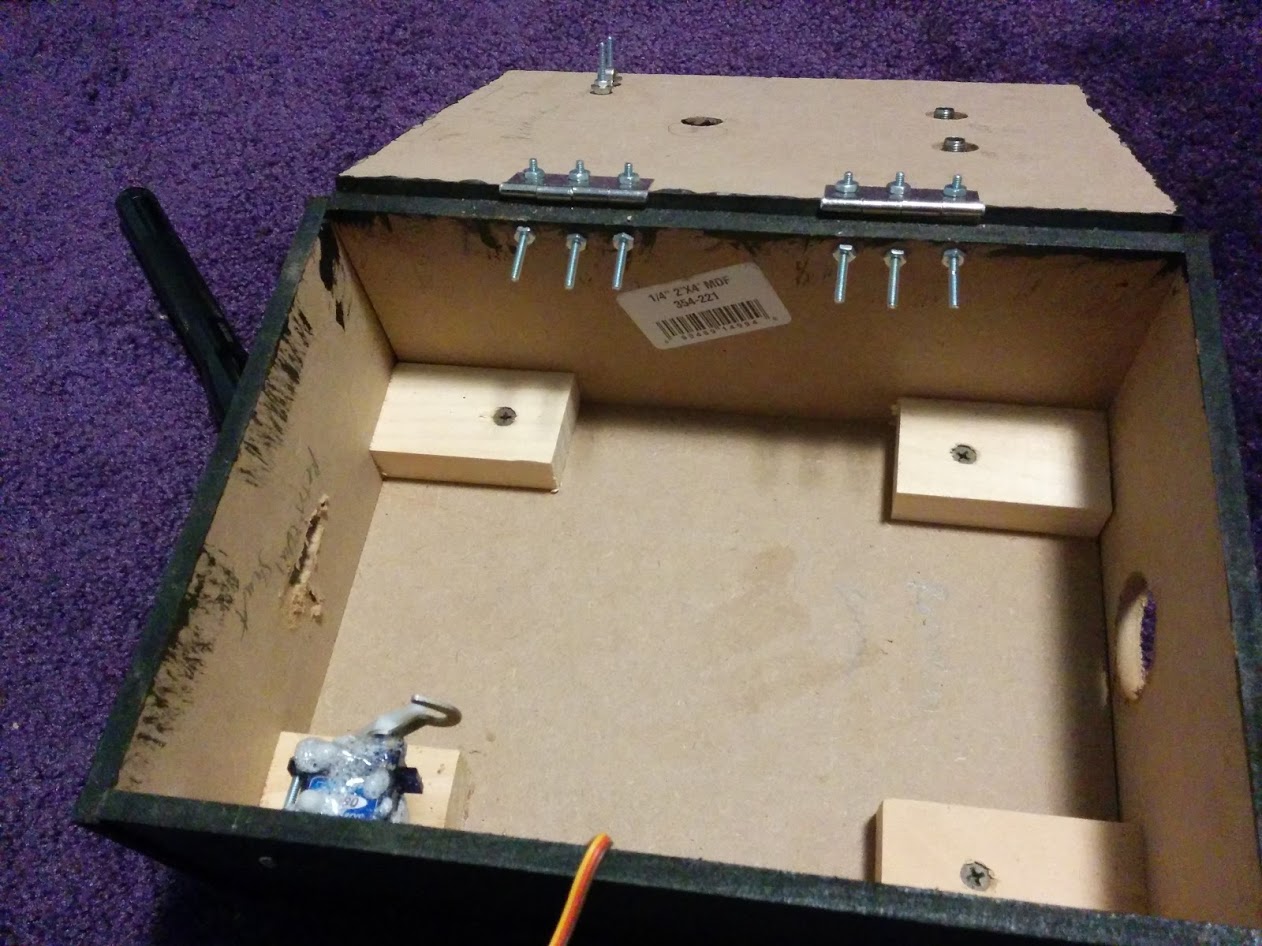
A wider view of the lockbox. Although it didn’t end up working reliably for the actual game, here is a video of how it should have worked: https://goo.gl/photos/ztWfvHdmS77i1cXR6
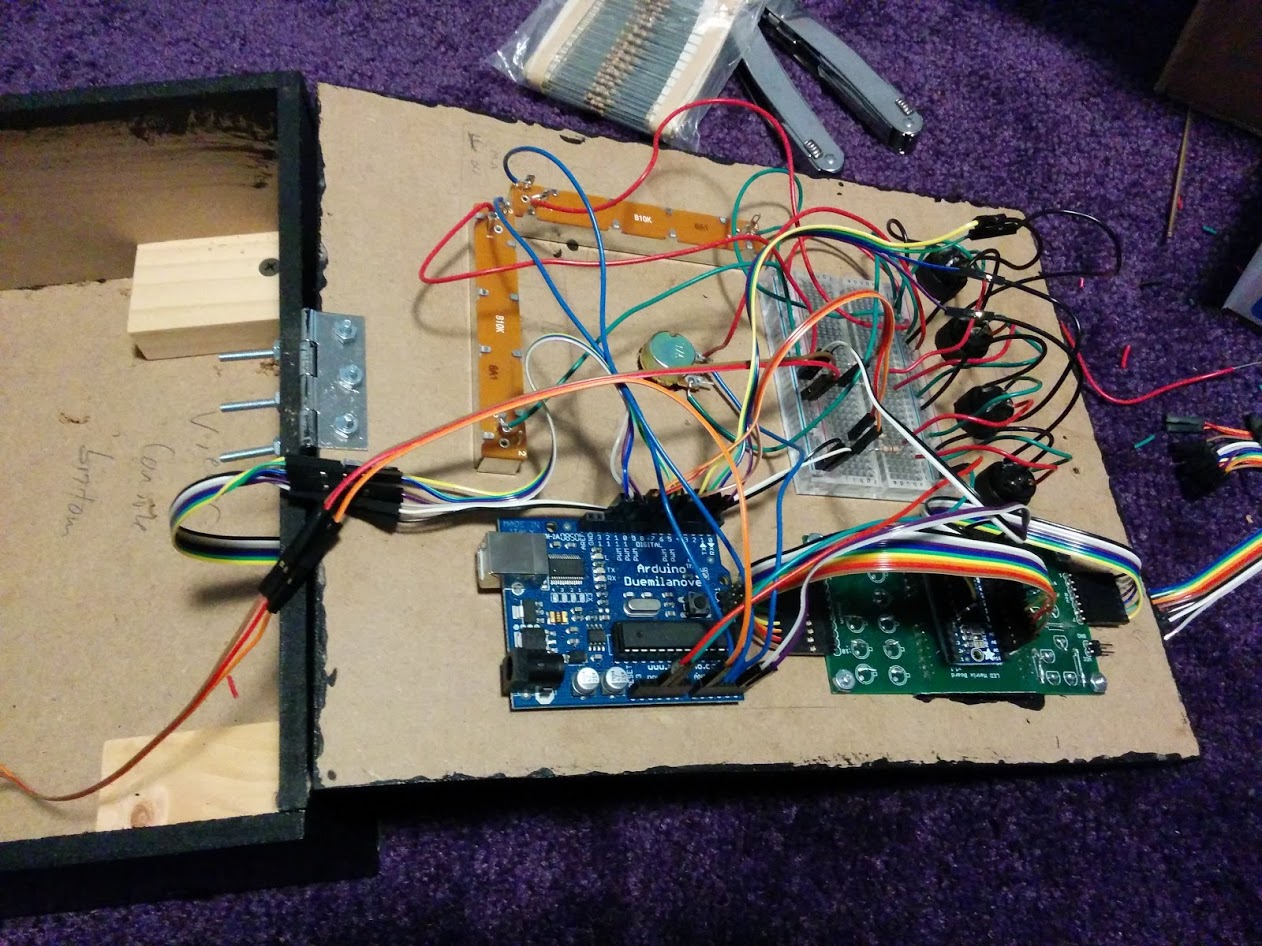
This is a view of the inside of the wired up ‘viewer console’. As you can see, these were all done with lots of jumper cables. As such, there was a real fear that various things would get disconnected due to jostling in transit. Amazingly, this did not happen. Debugging these boxes was a nightmare, because you had to figure out what each of dozens (or in one case well over 100) of cables did if something went wrong. But by this point there was under a week to go before the convention, so there was no time to do it the ‘right’ way (for whatever definition of ‘right’).
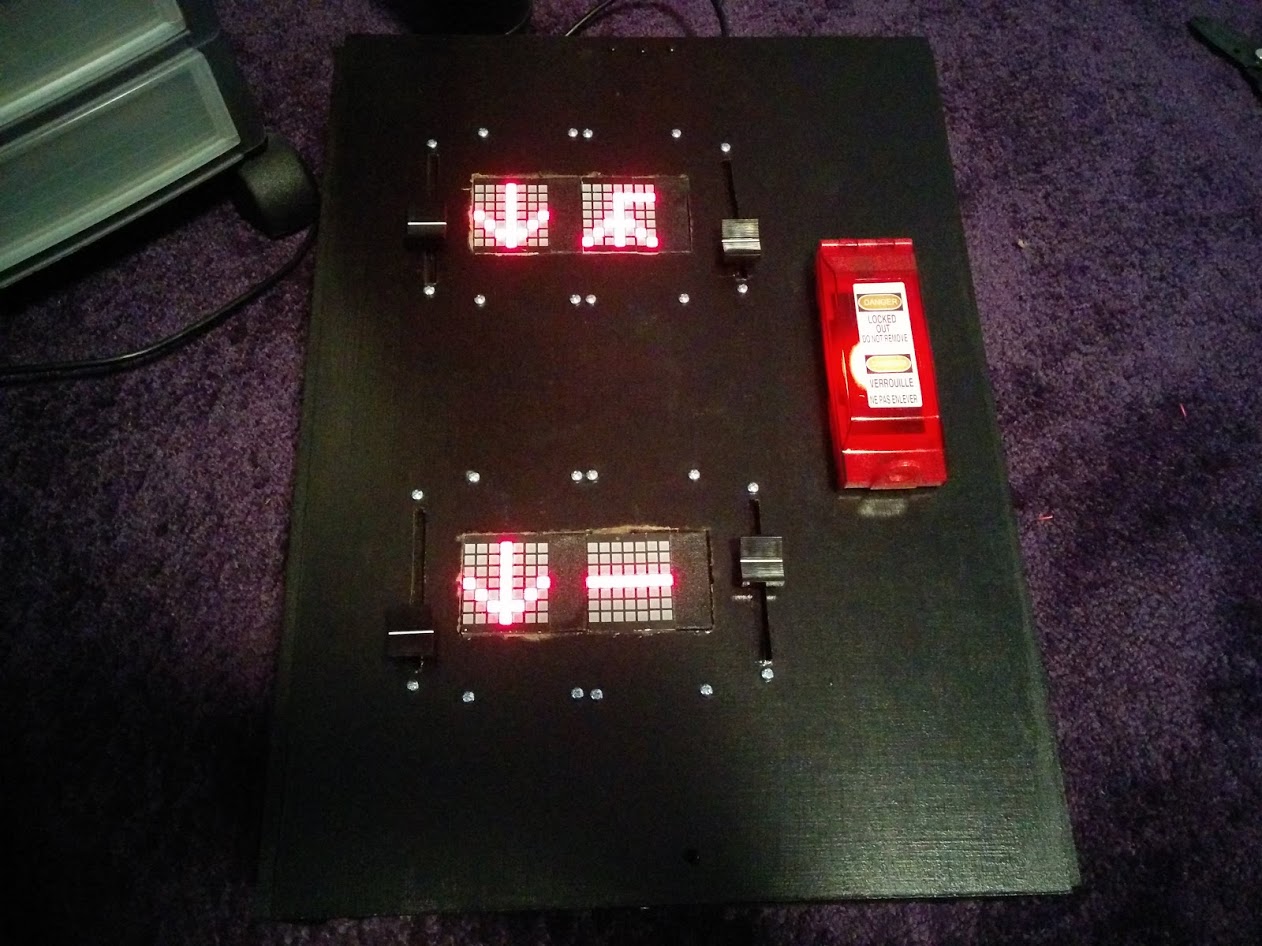
The navigation console. Each LED matrix showing a D’ni number was actually a 7×10 grid (made of two 7×5 grids), but I used gaff tape to cover the last 3 columns. D’ni numbers can be hard to read at 7×7 pixels, but they don’t make these kinds of grids in anything larger than 8×8 (and I had to work with what I was scrounging from an old college project). Still, they worked pretty well. The analog input from the sliders was pretty noisy, so they had a tendency to flicker between two numbers. In the end, though, it all just added to the realism of being in an old pod with deteriorating technology (that’s my story and I’m sticking to it >.>).
You can see a video here showing what 5×5 and 7×7 D’ni numerals look like.
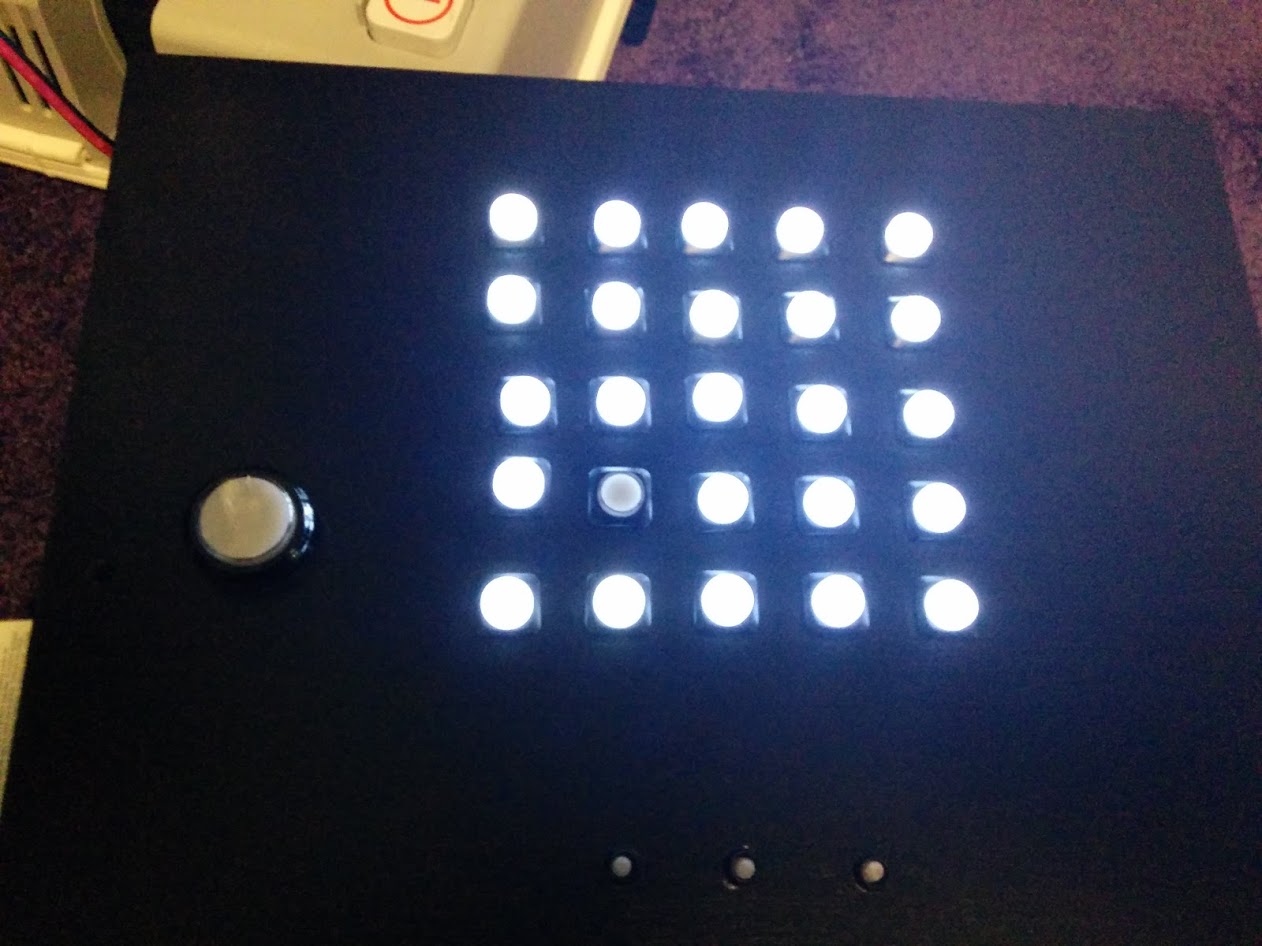
Here you can see an upside-down picture of the ‘power console’. That one button in the grid that isn’t illuminated randomly decided that it wanted to be out of sync with everything else around 2am on Thursday morning. Strangely, come Friday morning when I set everything up at the hotel, it had started behaving. I don’t ask questions when things work.
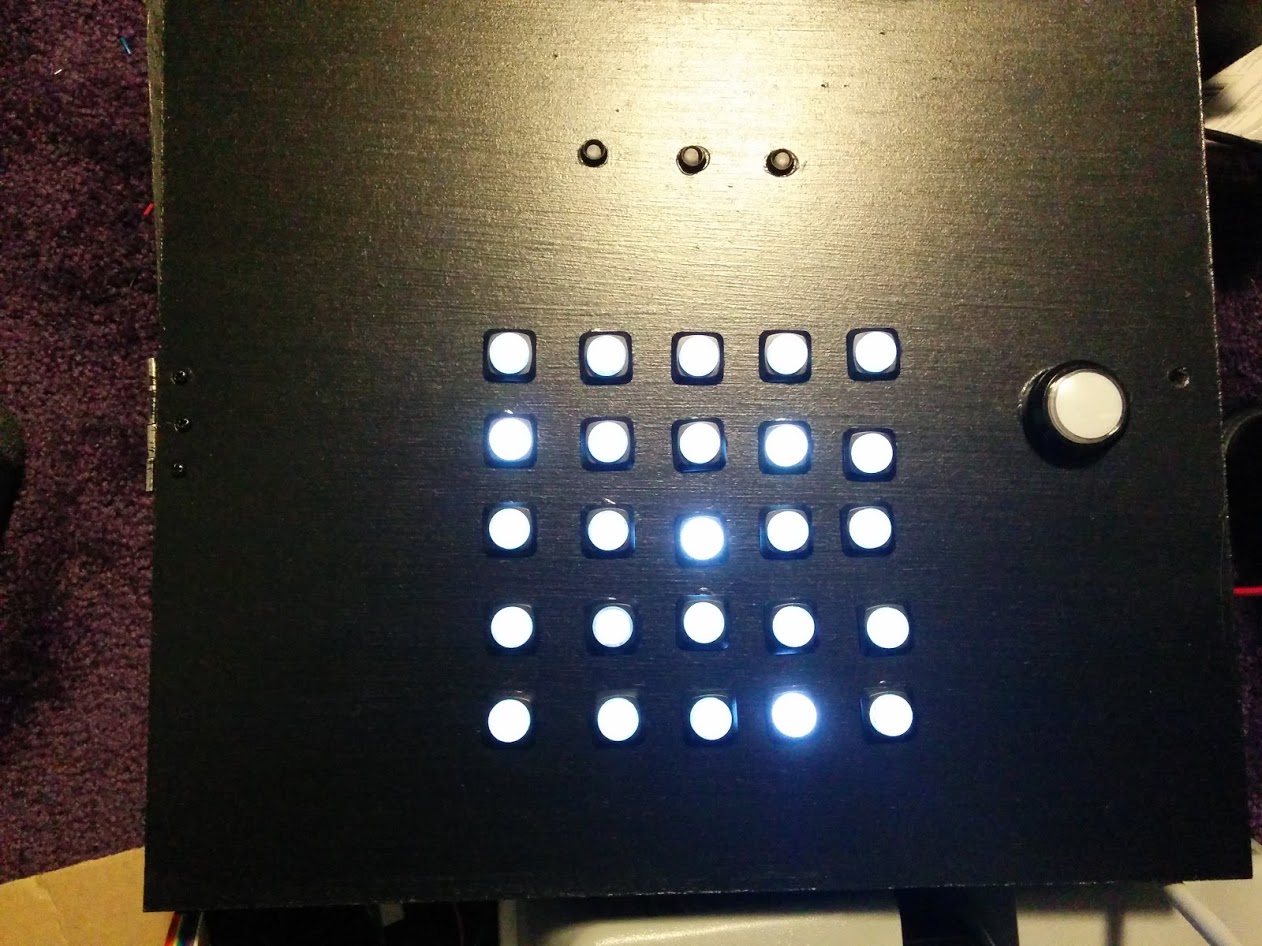
A better view of the power console.
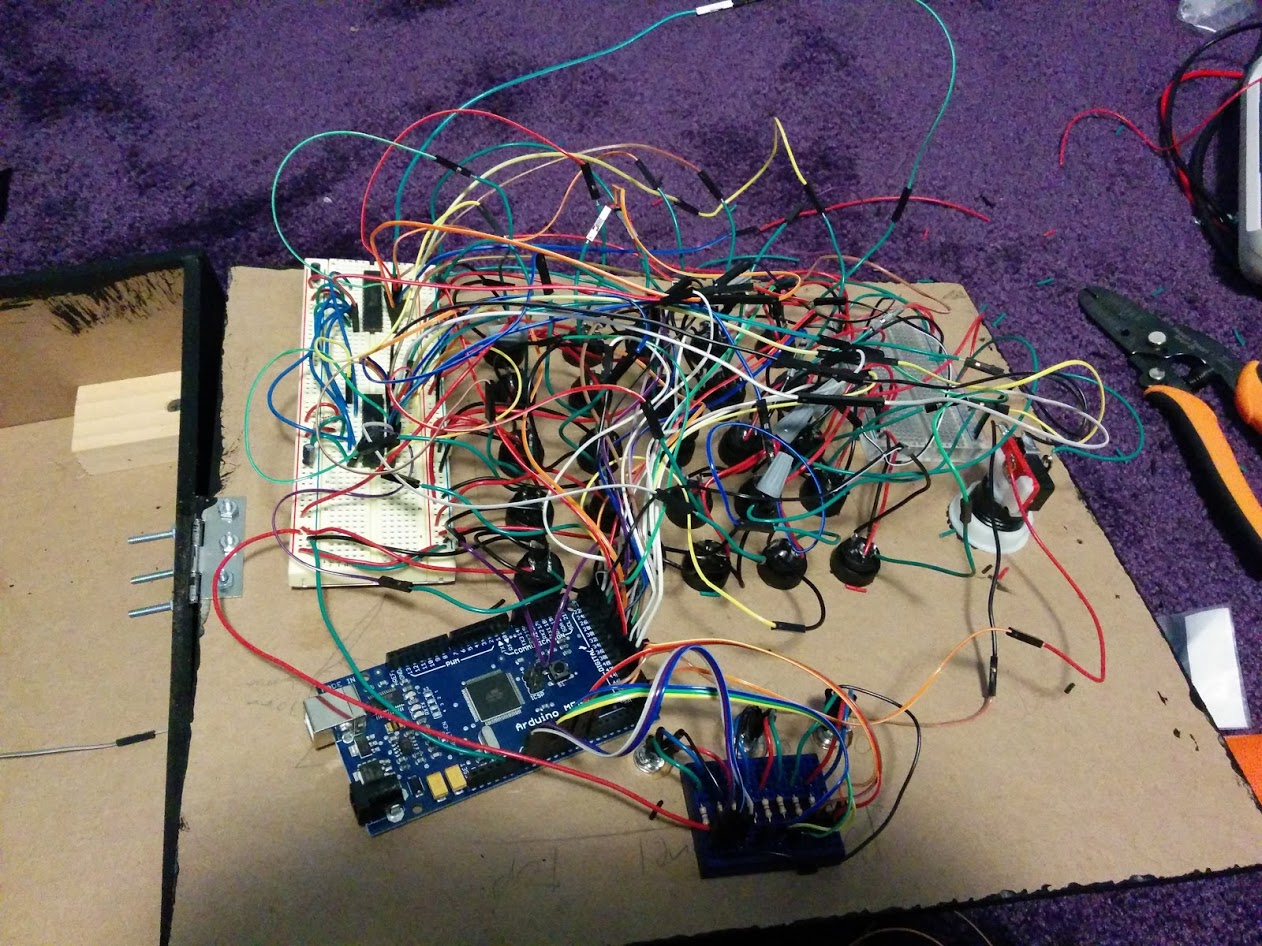
This is the inside of the power console. Each illuminated button had 4 wires on it (two for the button, two for the LED), so there were a *lot* of wires in this box. They had a tendency to come undone when working on nearby wires, and yet somehow they survived the trip to the hotel with no problems.
The microcontroller in there is a 1st generation Arduino Mega, for those interested in such things.
I don’t have pictures of the setup, but there were 4 more proximity sensors in the room: two on either side of the map table, and two others. Each pair was controlled by a single Arduino Pro. The Arduinos, along with some peripheral elements, were velcroed to some scrap mdf, which was taped to the bottoms of the tables. The sensors were screwed onto some scrap blocks of 1″x2″ lumber which were painted black with the enamel, and were then wired back to their parent Arduino with long pieces of hookup wire. These blocks were then gaff-taped to the tables. I was worried that they would be too obvious, given the black tape against the light-colored table… but no one noticed them. We had to put markings on the floor, and even then no one could figure out that there were sensors. We finally had to draw a power symbol on those markings to get people to realize that the sensors existed!
You know the old design adage, “no one looks up”? … well apparently no one looks down either.
Eyli
The design document calls for a boardgame known as “Eyli”, the rules of which the players must learn if they want to solve the puzzles. Here is a link to the initial design document for Eyli. This document is mostly accurate, save for the look of the so called ‘Fragile Kah’ pieces, which I will address in a bit.
Eyli was a fantastic concept, and Tonbury obviously put a lot of effort into the design. The pieces are varied and interesting, and you don’t realize that they are designed to form D’ni numbers until they actual do so. Unfortunately, the game rules are extremely complex. In hindsight, we realized that we should have just given players the rules from the beginning, rather than scattering bits and pieces in journal text and audio logs. All of the information was there, but players simply didn’t have enough time in the hour allotted to figure out the whole picture of the rules *and* solve all of the other puzzles.
This is what we get for not leaving time for playtesting. Oh well, at least people had fun.

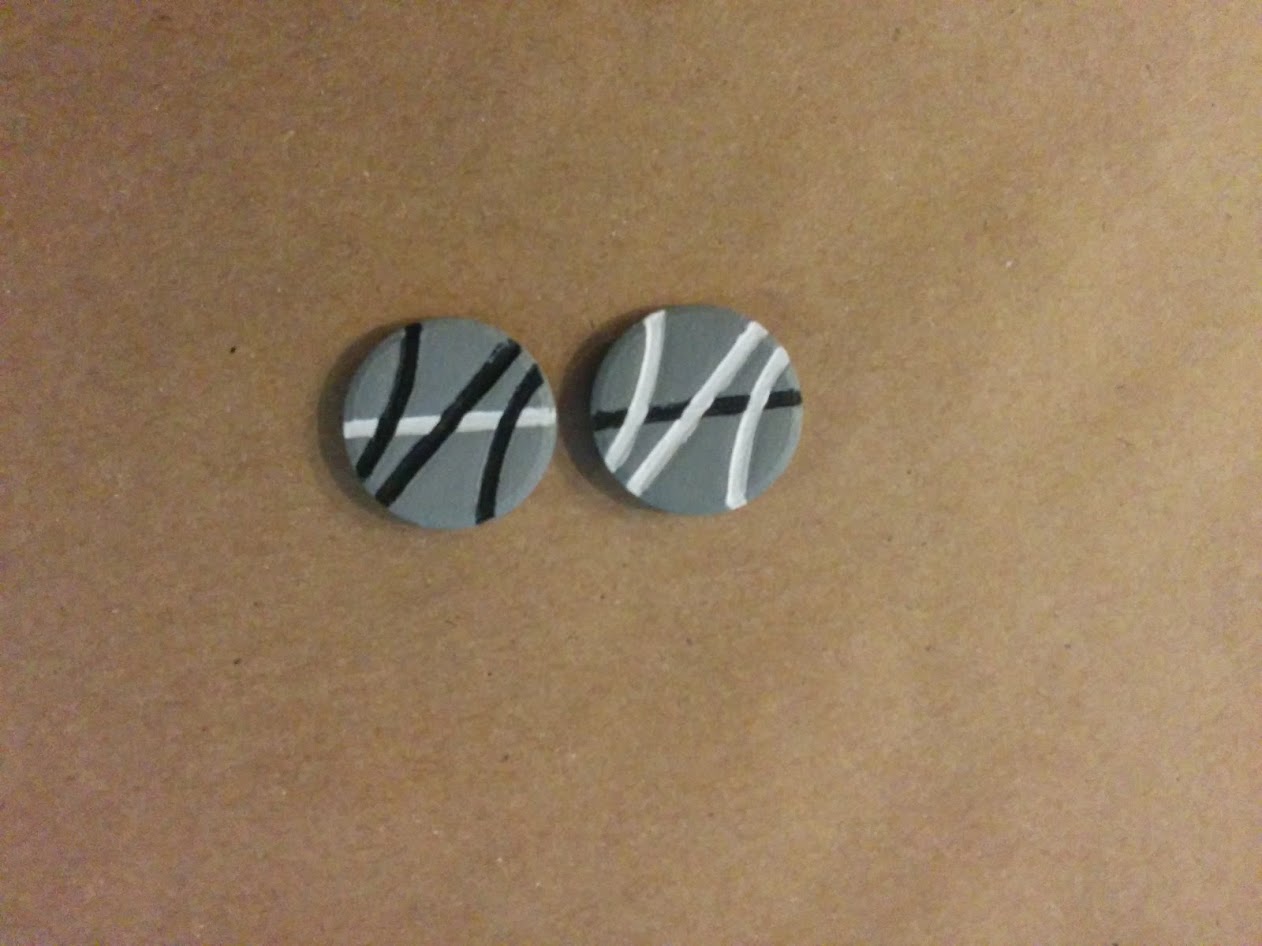
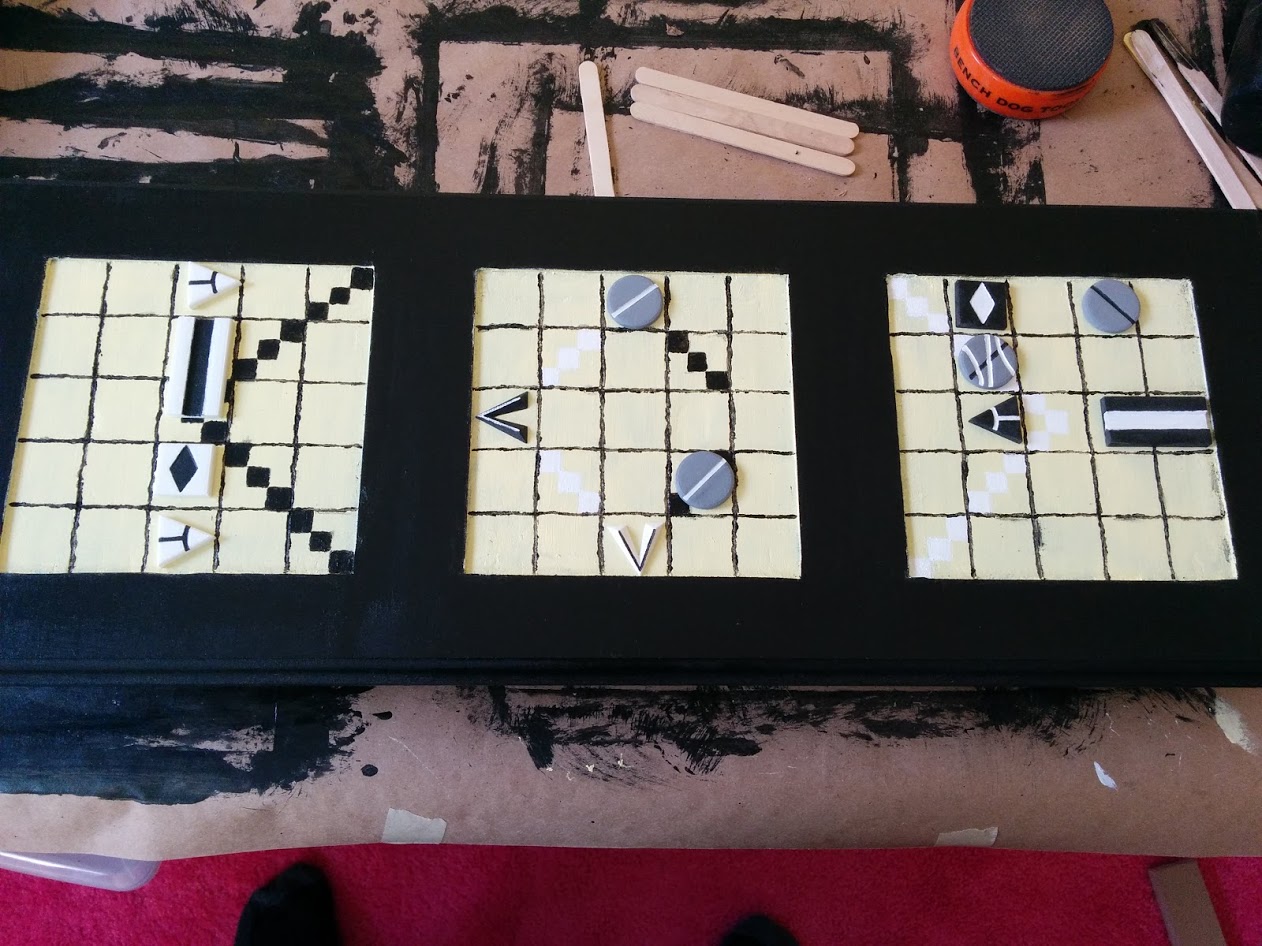
Back to the subject of the Fragile Kah, you can see the original design in the middle (initial side) and right (other side) above. The ‘crack’ felt messy to me, so when I was modelling the pieces to be 3D printed, I decided that we would instead have the two straight lines be on both sides.
The next problem was that they could be flipped in two different directions, resulting in the two lines still being aligned, but the two curved parts being swapped. The final solution was to make each Fragile Kah have both curved segments use the same color. We lost the symmetry, but it was a simple fix to the problem.
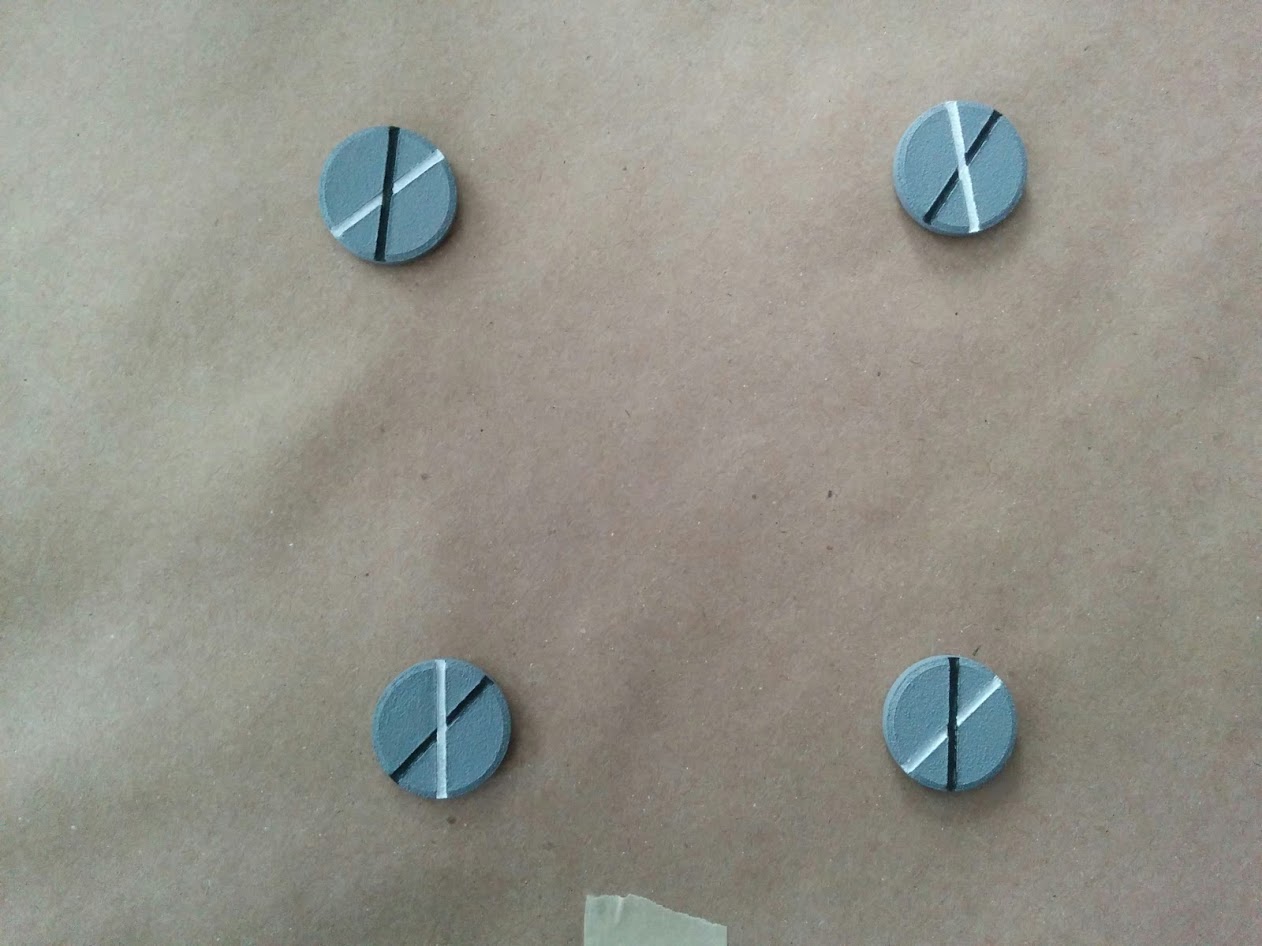
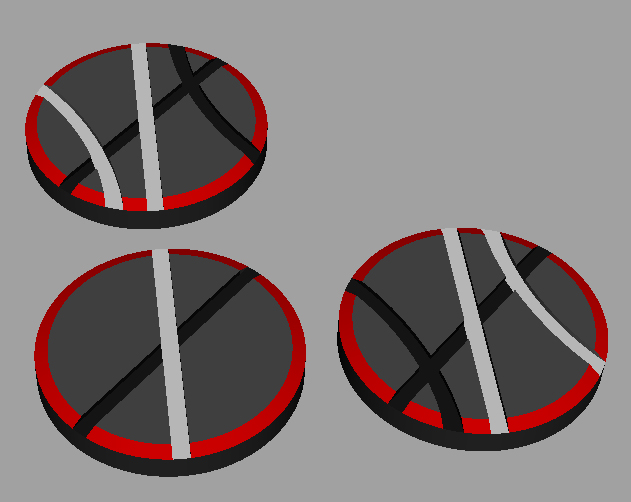
This is the new starting alignment of the Fragile Kah. It wasn’t until they were printed and painted that we realized the next problem: they can’t all be identical and have the diagonals face opposite directions in opposite corners (like the original design called for). It was too late to change anything else, so we just decided that the diagonals would all point the same way. Again, loss of symmetry for an easy fix. You’ll notice that one of the two lines is always solid while the other is divided by that solid color. The solid line is always vertical, and is the same color as the curves on the back.
A view of the backs of the Fragile Kah.
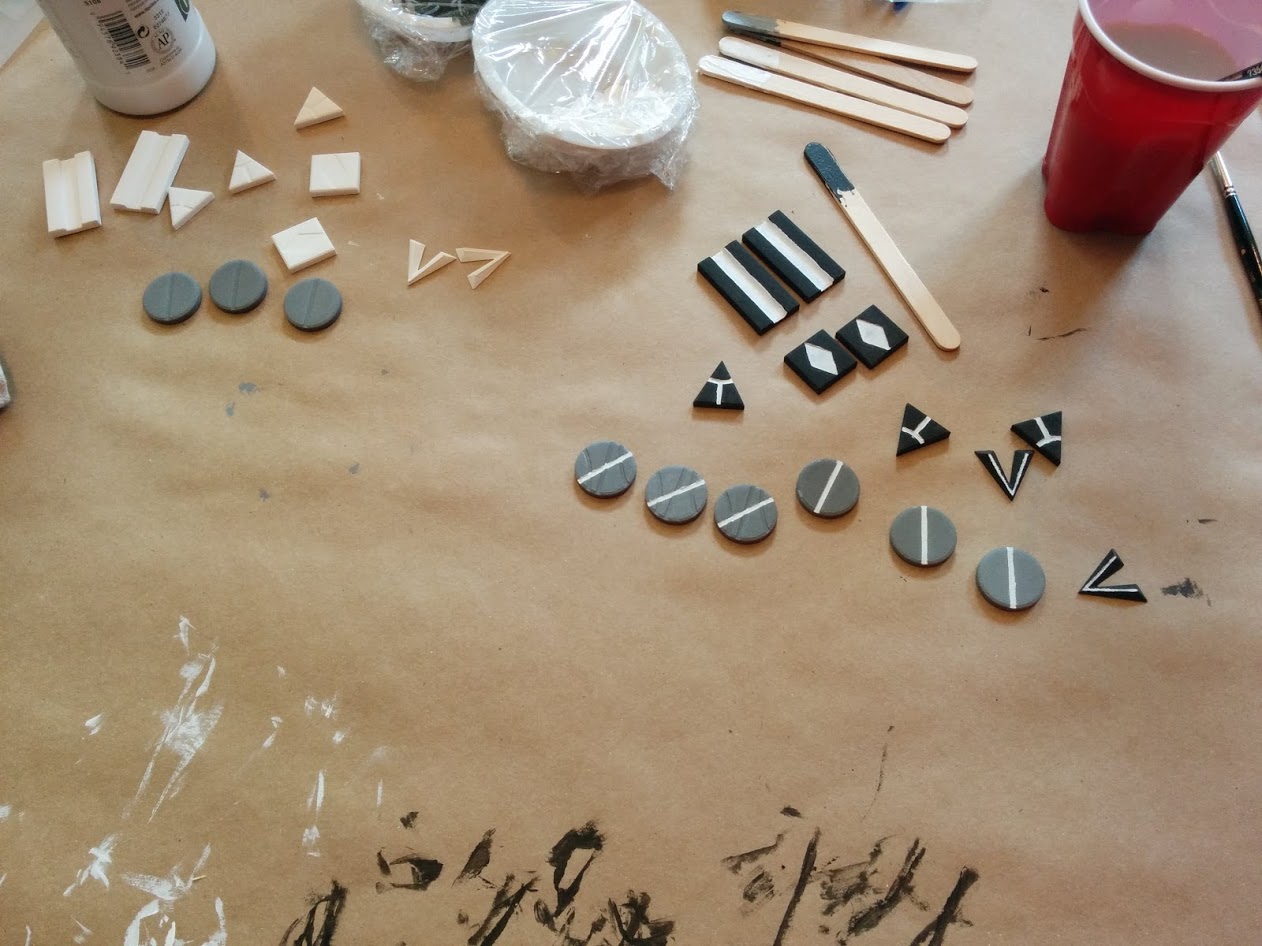

Some views of the Eyli pieces in progress. They were all printed at Shapeways, and painted with acrylic paints.
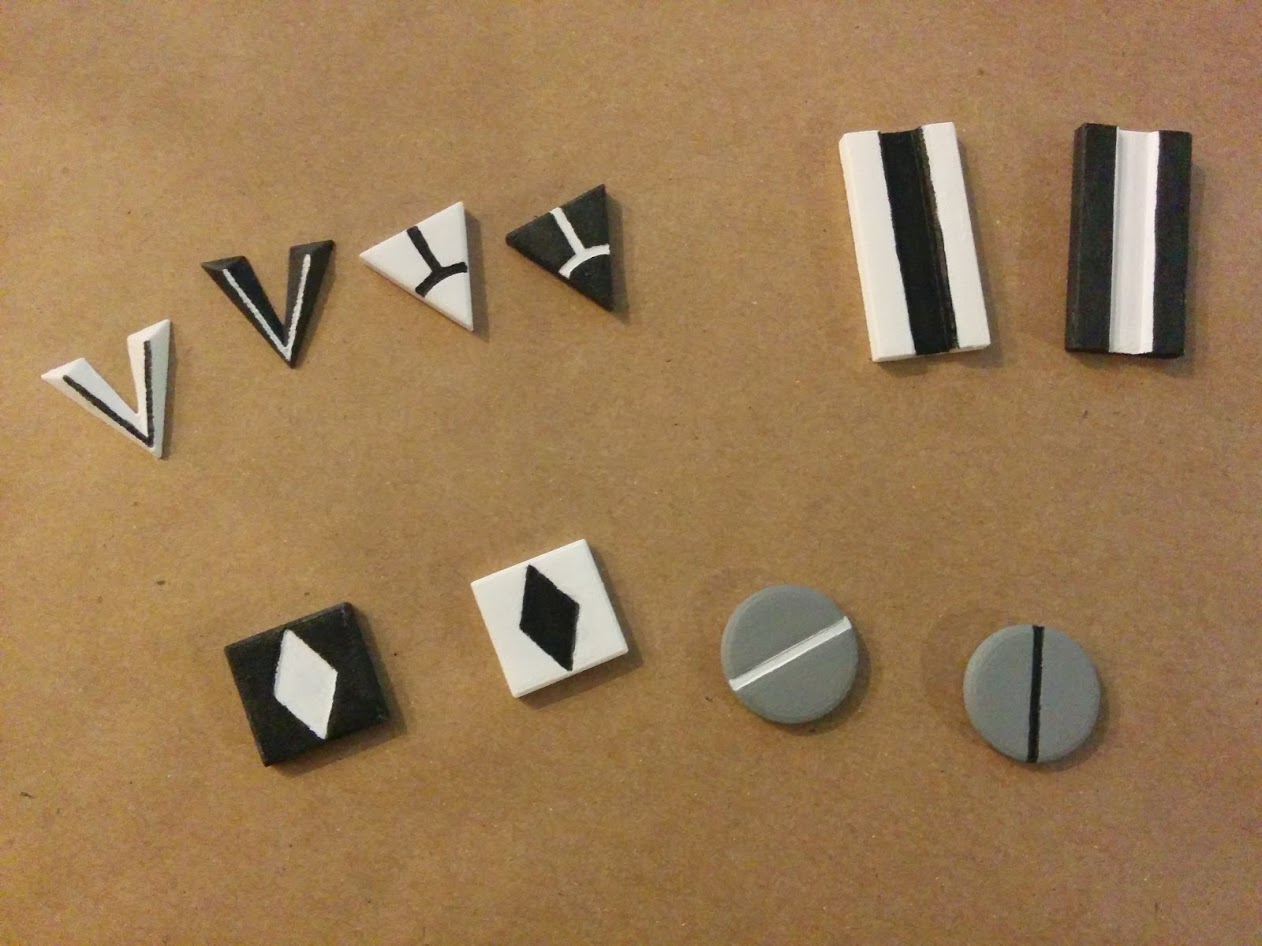
A close-up of the other finished Eyli pieces.
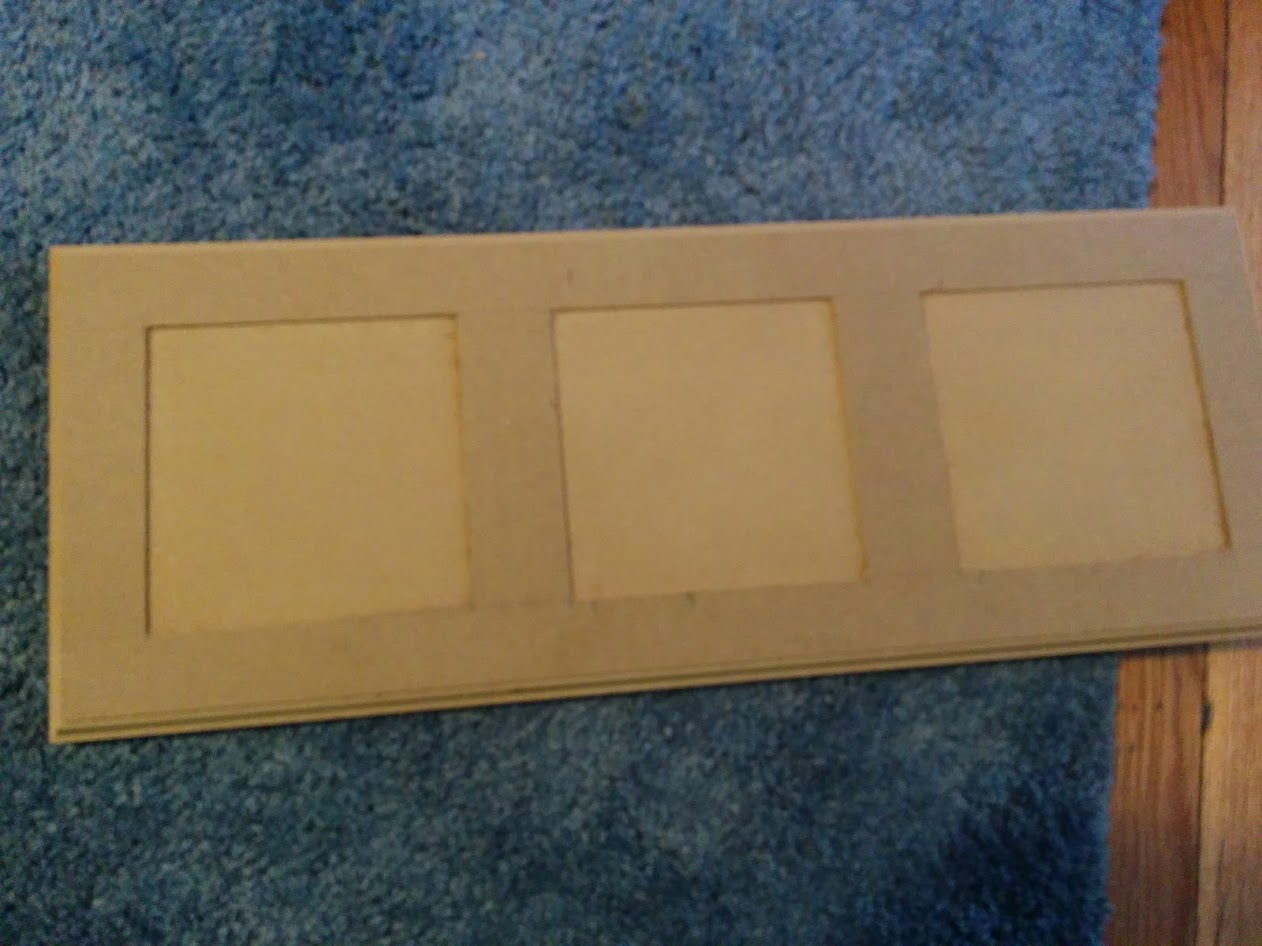
The Eyli board was cut out of a piece of 3/4″ MDF. The three board squares were plunge routed (I finally had an excuse to buy a router) and cleaned up using hand chisels, while the outside edge was routed to have a nice decorative detail. The lines in the board squares would eventually be cut using a very fine Dremel bit.

Here is a view of the completed Eyli board. It was given a coat of that same black enamel used on the consoles, and then the three boards were further painted using assorted acrylics. From 2’x4′ sheet of MDF to finished Eyli board took about half of a very frantic day, on the Monday or Tuesday before the convention.
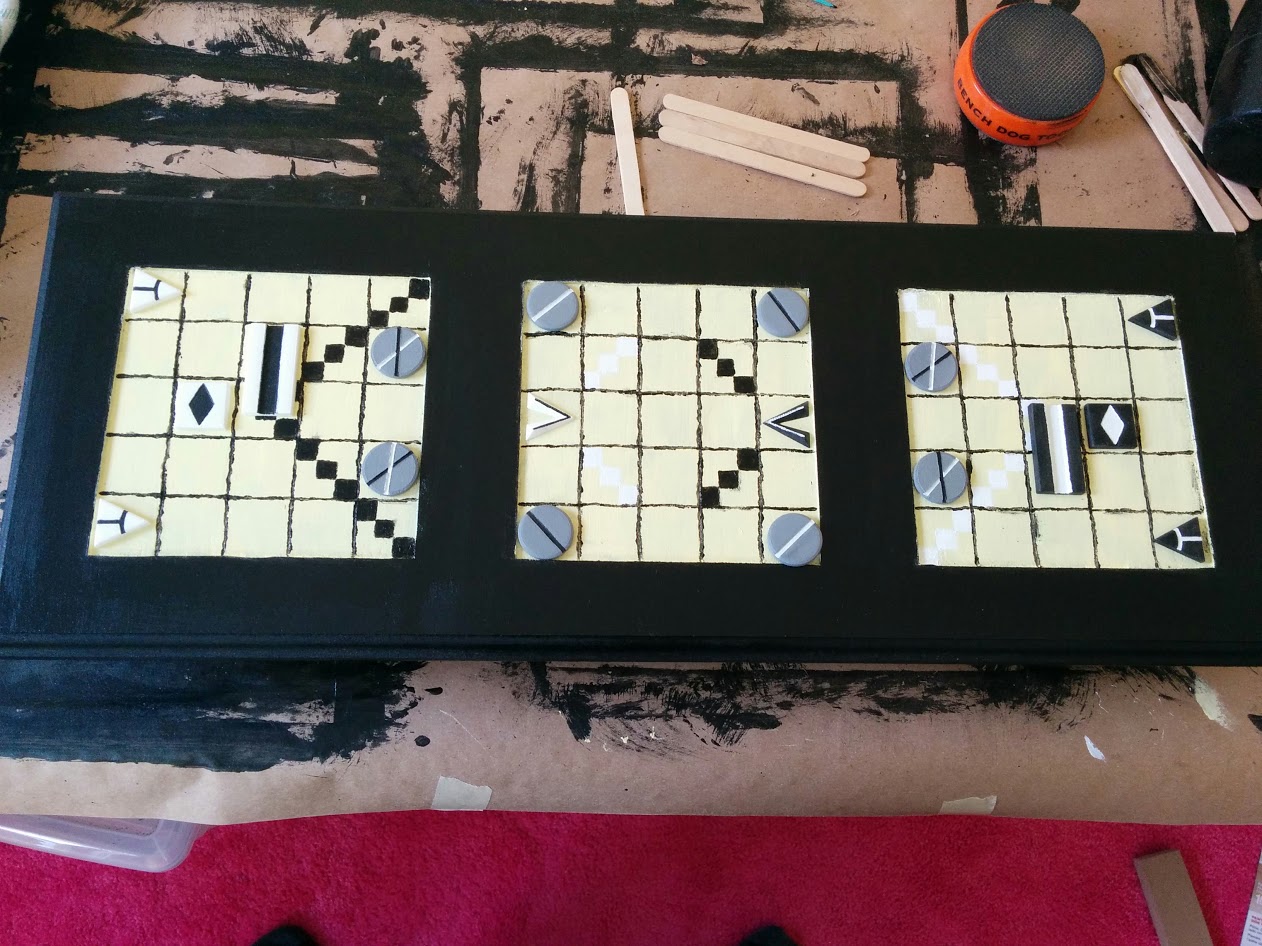
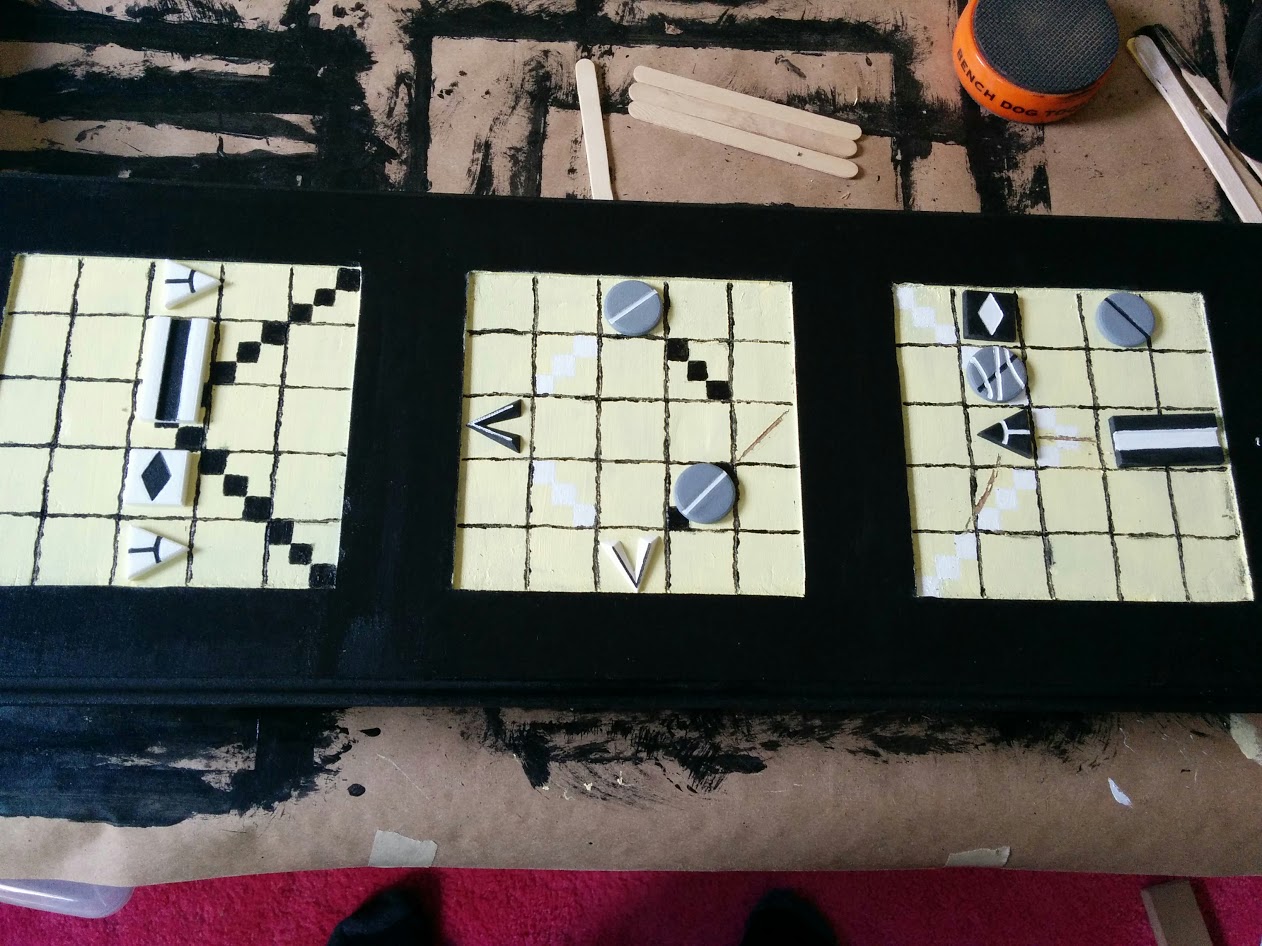
Here is the board as it looks in Eyli’s initial state.
Here is the final solution to the main puzzle…
Here is that same solution after we added some scratches as hints…
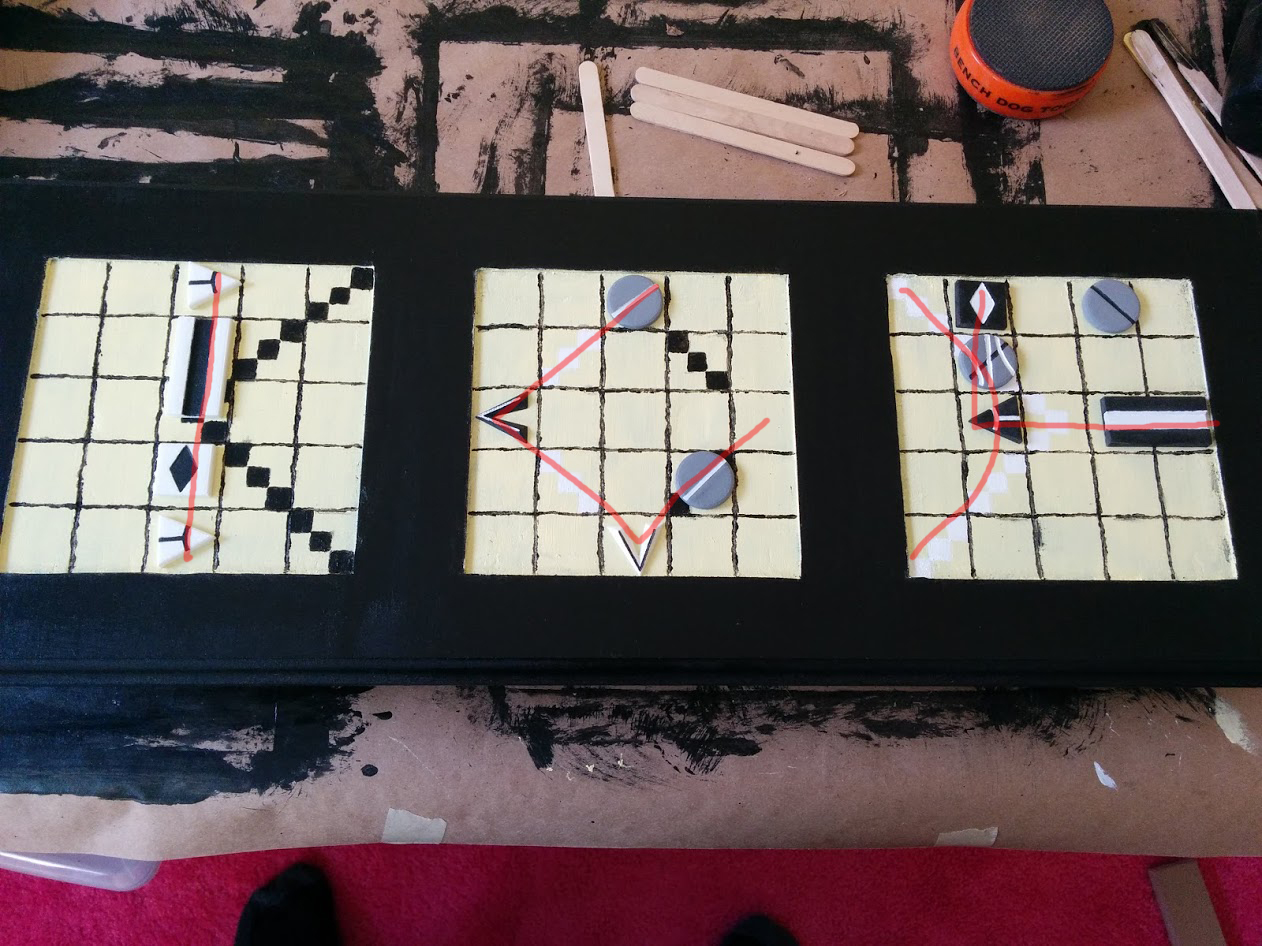
And here is what the players were supposed to notice in that solution state. It creates three D’ni numbers that translate to 1097 in Base-10. This is the combination to a padlock on the navigation console.
The board and game pieces were raffled off during the prize drawings at the end of Mysterium. Please let us know if you actually learn to play the game!
Atrus
Early in the design process (pre-June), we had the idea that we might have some video imager logs for the players to find. Someone floated the idea that we get LaughingPineapple to record some in her Yeesha cosplay, which would have been wonderful. But then it occurred to us that we might be able to convince Rand to reprise his role as Atrus. So I dropped the idea in one of our regular checkins about Cyan’s plans for Mysterium. I’m told that Rand loved the idea.
I tell ya, there was definitely a little stress when we weren’t able to get them until the Wednesday before the con, but Rand definitely delivered. He later told me that he had trouble remembering *how* to do the Atrus voice! 😀
Before the Obduction presentation, I got permission from Rand to release the audio (we didn’t end up doing video). So here it is. Do with it what you will. We added static and distortion to the final versions, but this is the raw audio from Rand.
The Journals
Tonbury wrote a pair of detailed journals for the game, the text of which you can find here. The physical journals were written by Tonbury (Dmitri) and Riv (Nicole). The online text doesn’t include some of the drawings that were in the final versions, but should otherwise be complete.
The Map
The design doc called for a map of part of the age, which the players would use to navigate the pod.

This is the initial rough sketch of a map that Tonbury sent to me.
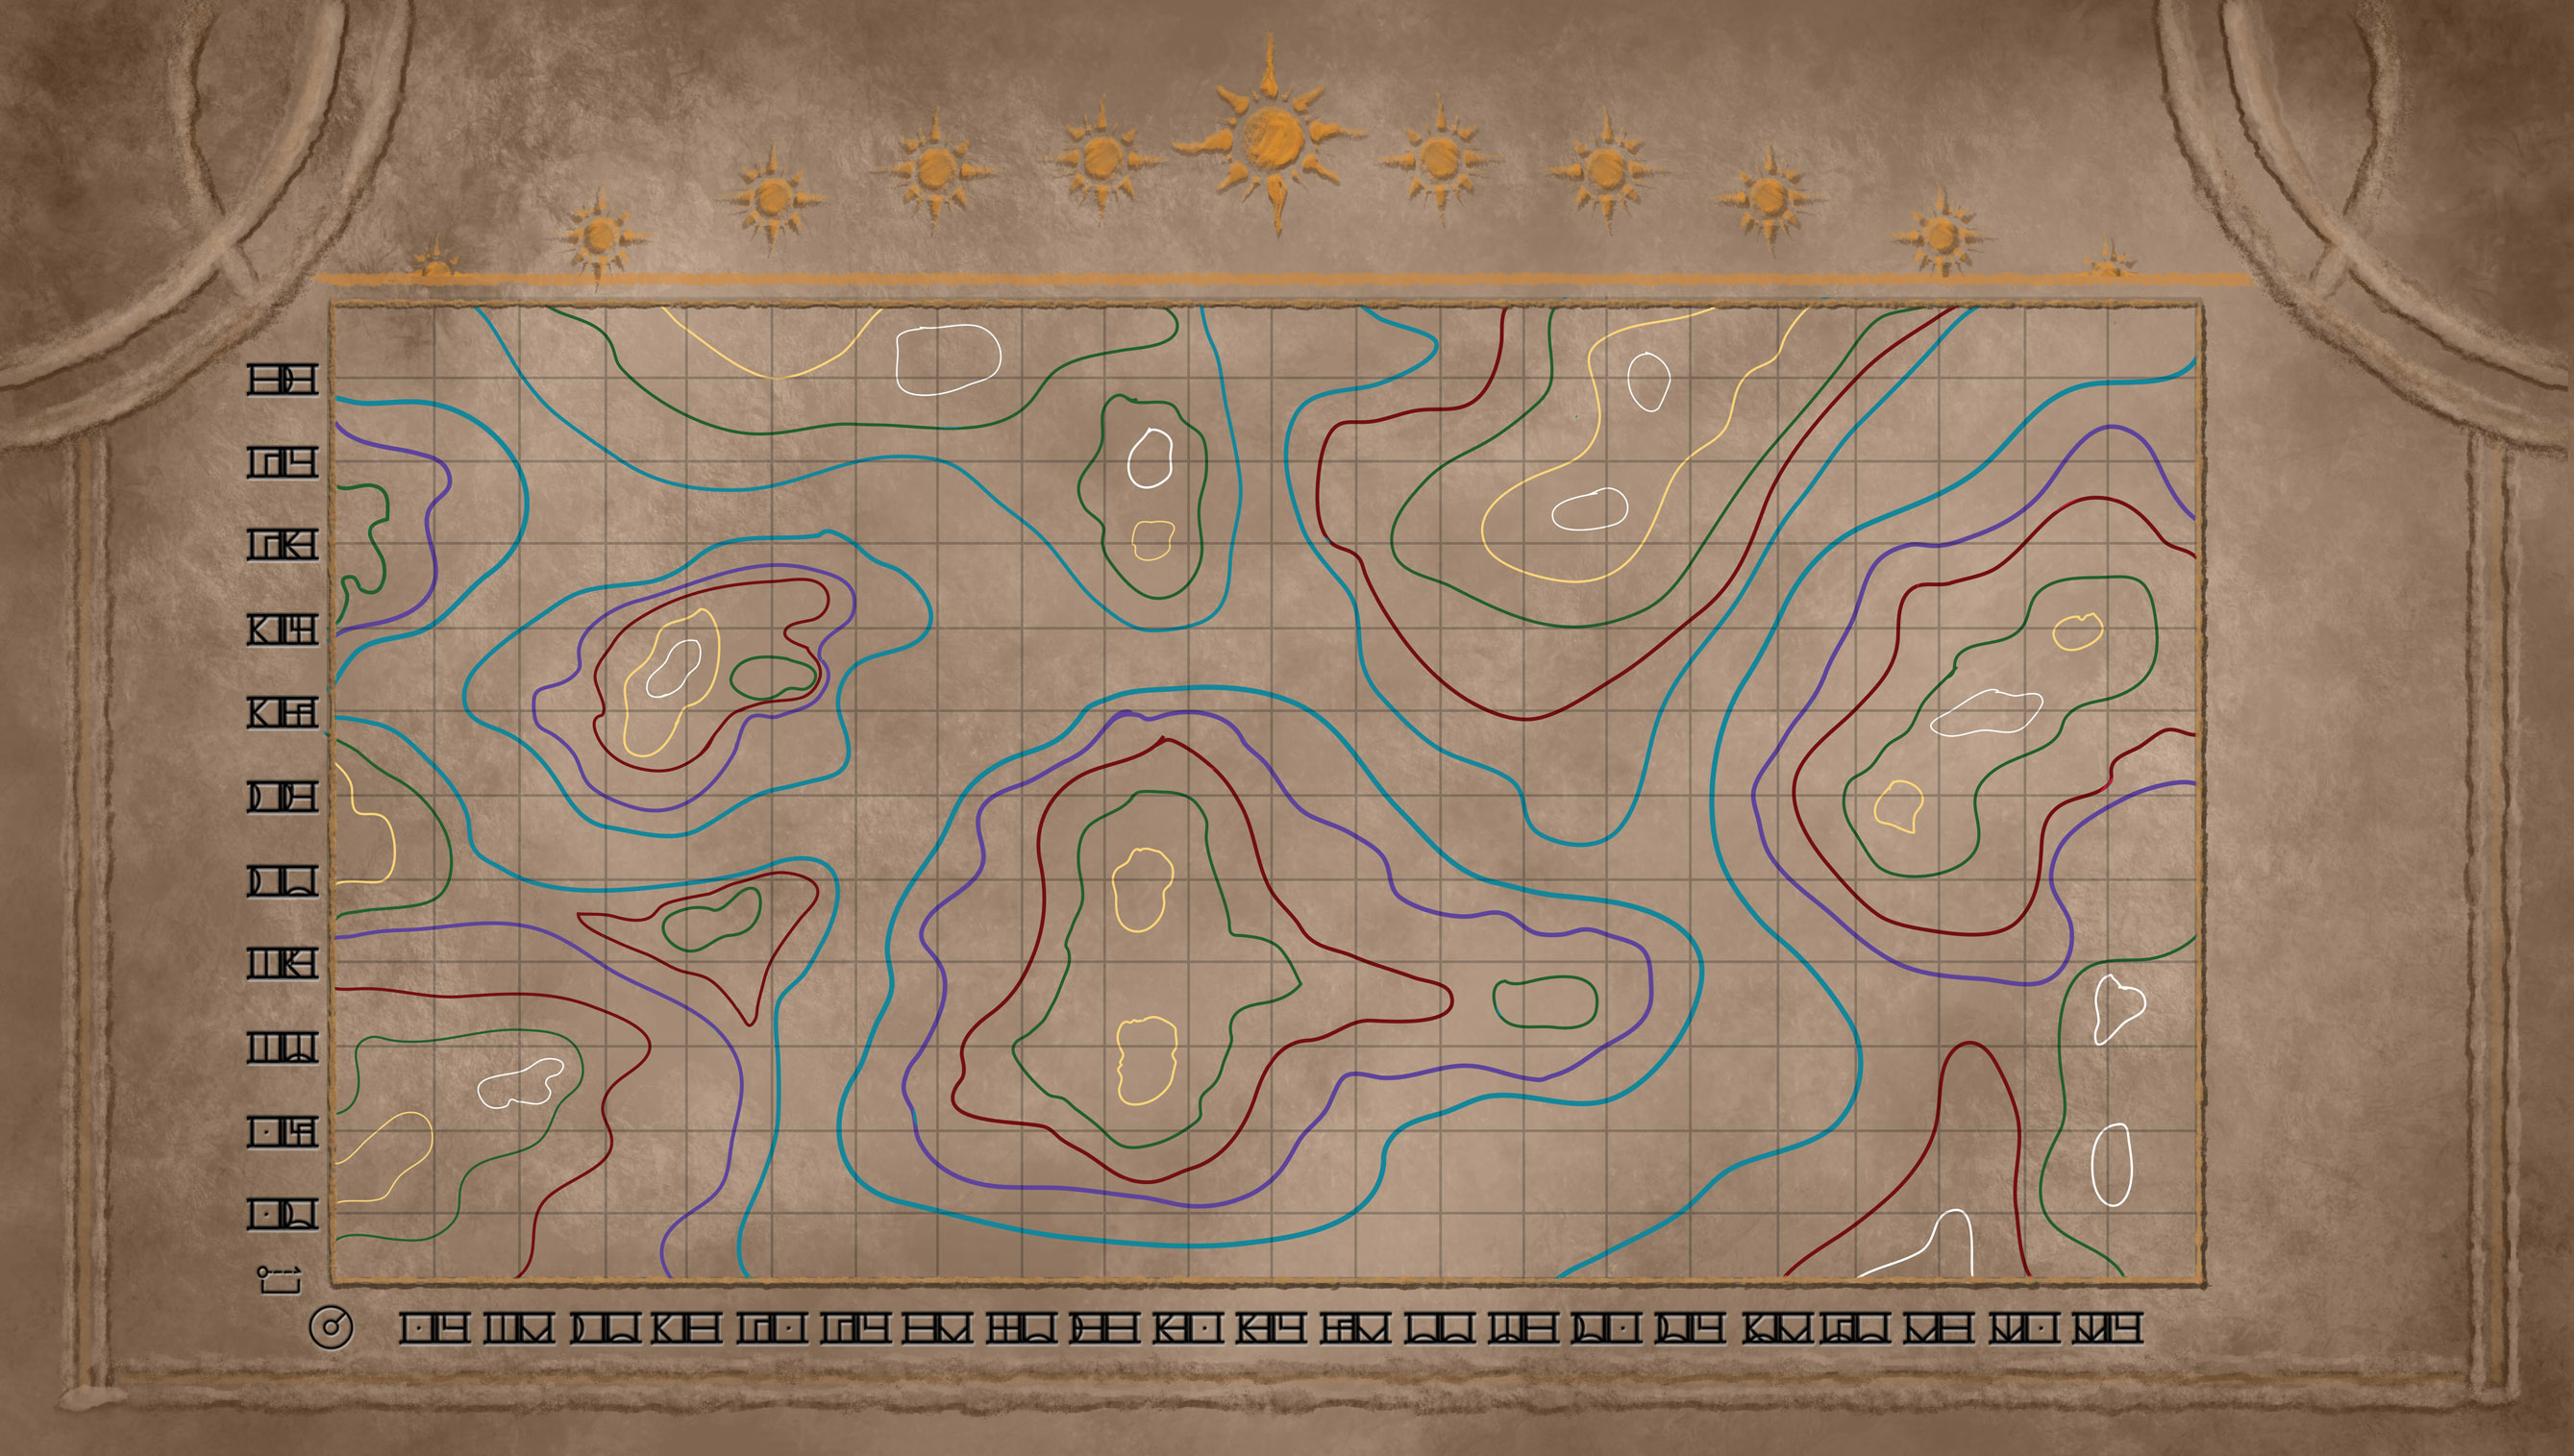
And here is the final version. As with the Mysterium conbook, this map was designed by my friend Samantha Rabbitt as a favor. You don’t want to know how many lunches I owe her for her work on Mysterium-related art.
It was requested on-site that we make the print-quality file for this map available online, so here it is. You have permission to make prints of it for non-commercial, personal use. We printed it on a $15 indoor banner from Staples (the smallest size they do).
It is explained in the design doc, but the solution is 8-0 Torans, and 1-23 Spans… just to the east (right) of the two yellow peaks near the center of the map.
I’m no cartographer, so I’m not entirely sure we got the conversion from Longitude and Latitude correct. Based on my cursory research on Wikipedia, it looked like longitude is actually based on degrees, so the use of Torans (the D’ni unit for angles) seemed correct. From there, we used Spans for the latitude, and were planning to use the D’ni symbol for elevation to denote the elevation key. It wasn’t important to the puzzle, but my really rough calculations while trying to number these put each grid square at roughly 3 miles to a side. That assumes that the span values were multiplied by 100 (base-10). If my math is off… well, please don’t tell me. I did it in about 10 minutes while trying to make the map vaguely plausible.
The Final Solution
To solve the game, players had to navigate the pod to the correct location (having solved Eyli for the combination lock, and the map for the coordinates). Once they had done so, they could turn the viewer console on. Until this point, it would have only shown them washed out, lens-flared images of nothing. However, when the pod is in the right location, it shows something else…
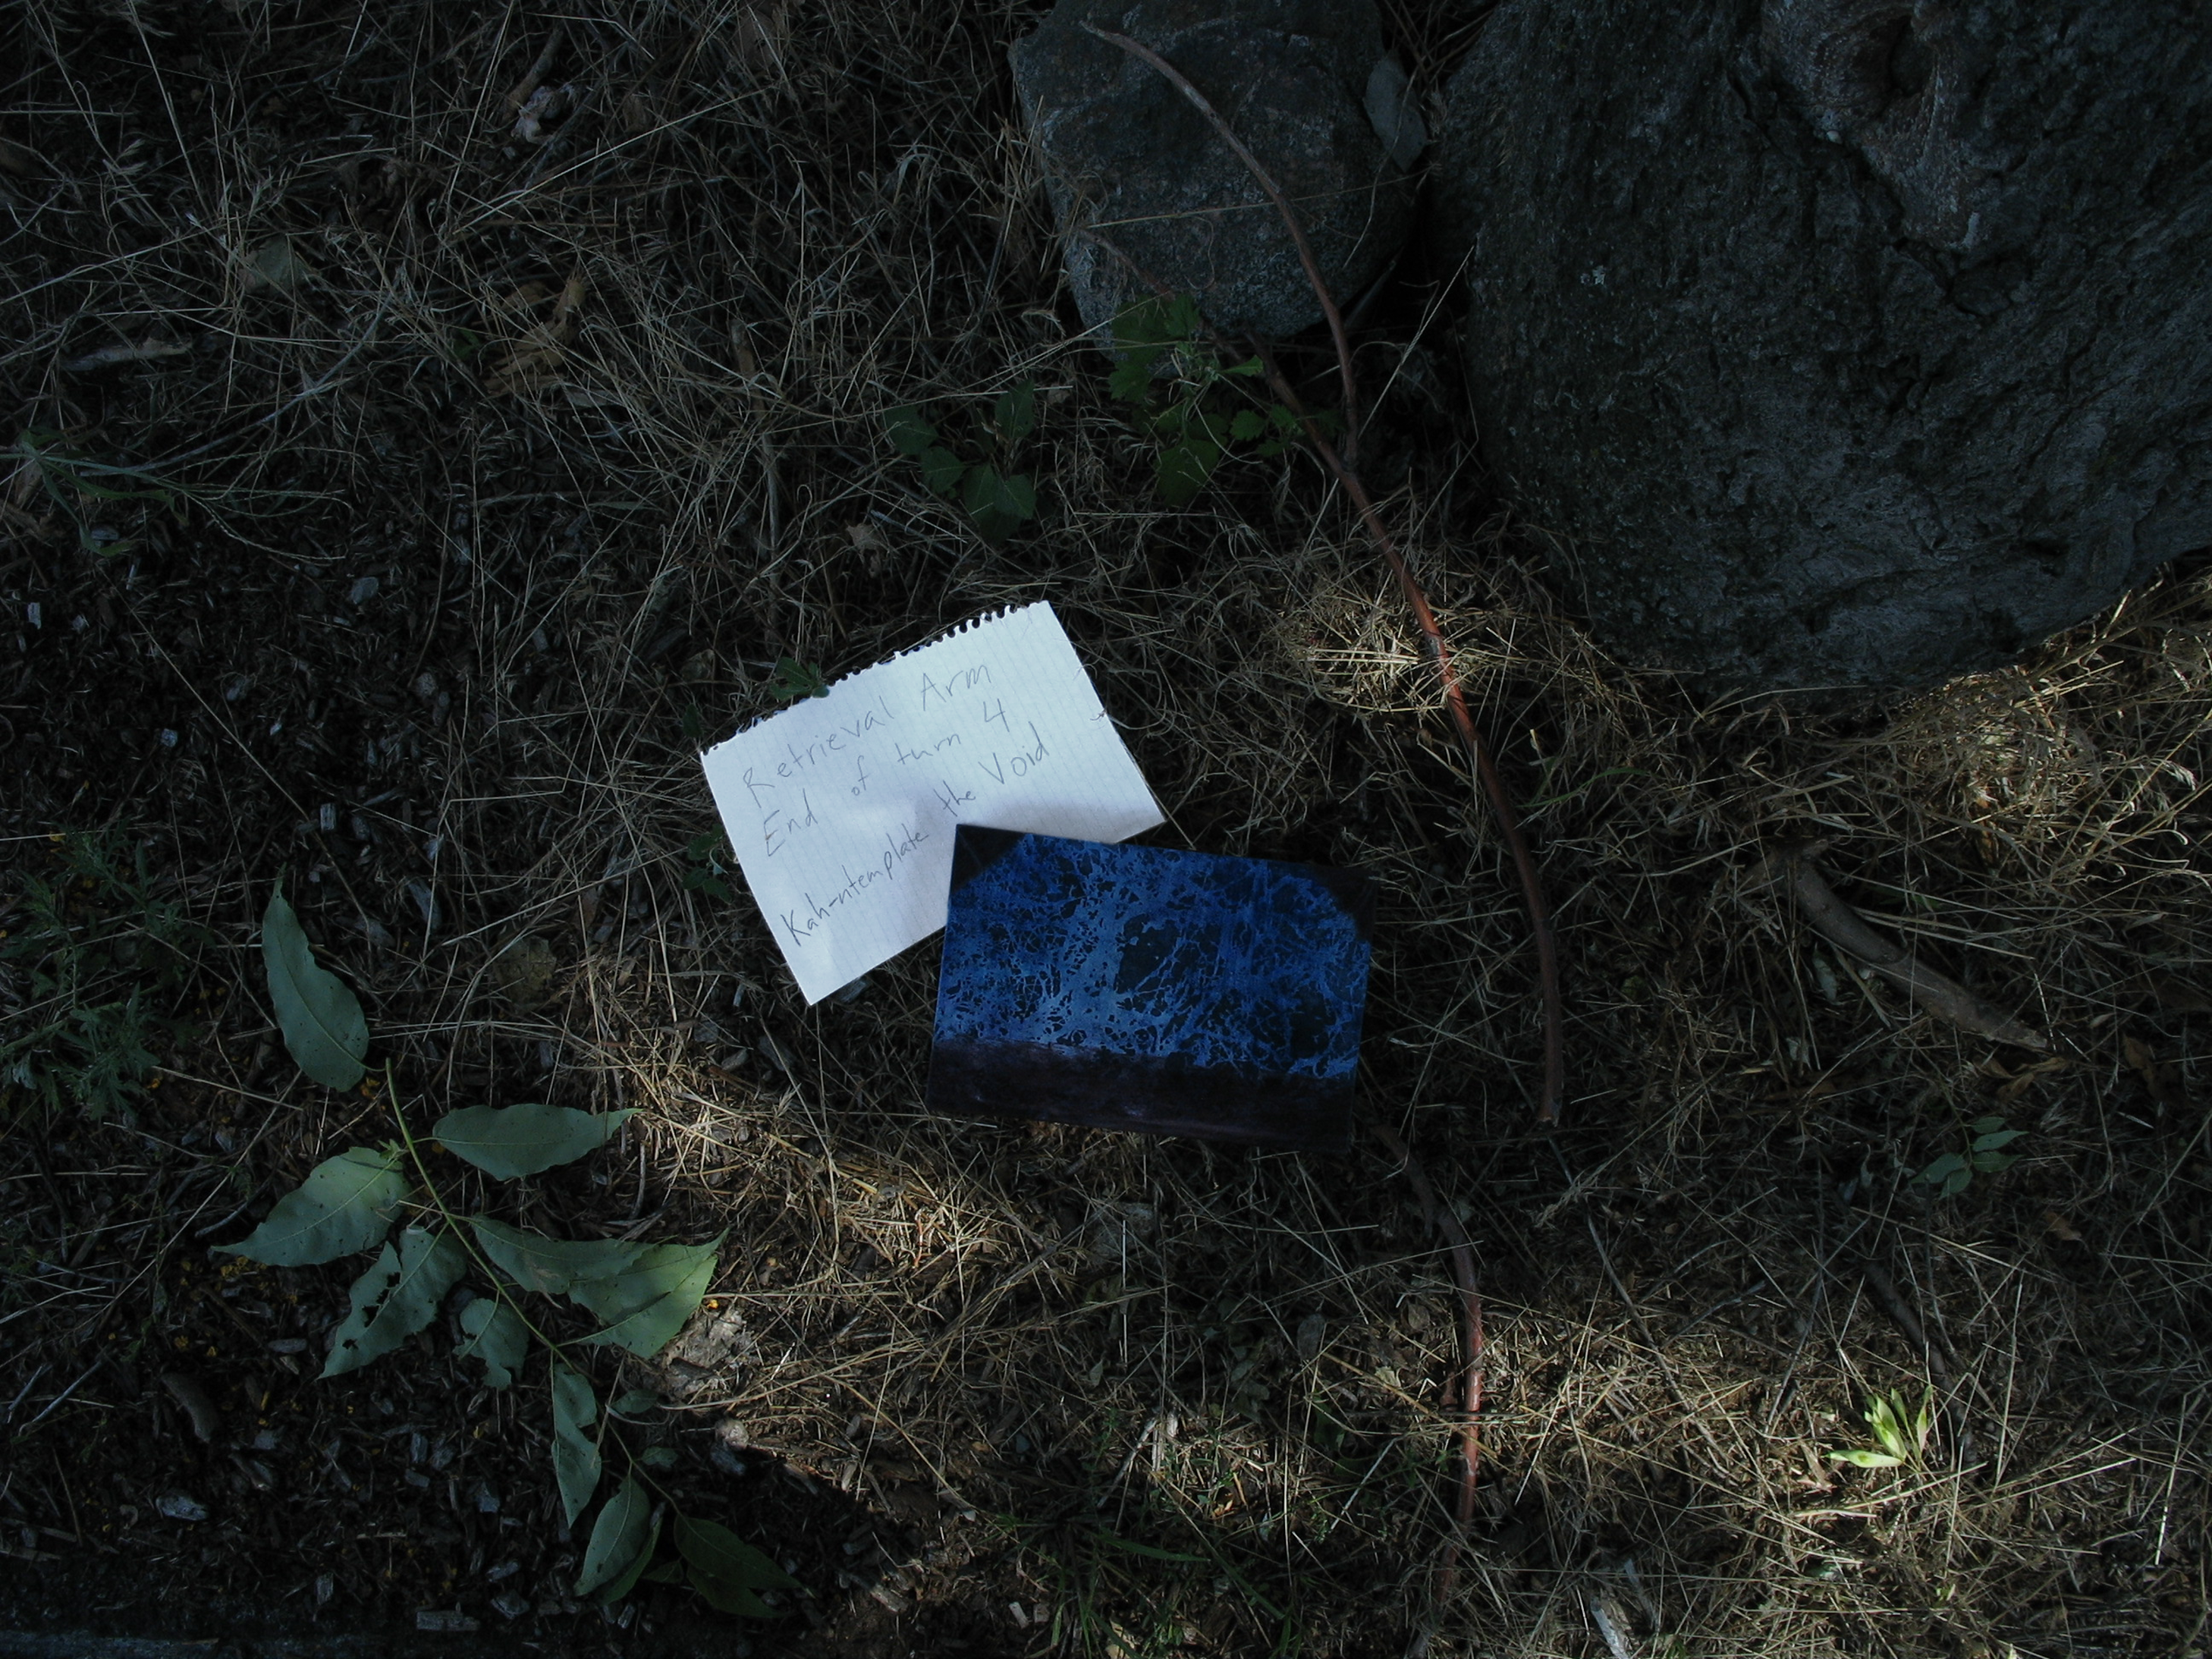
Riv created a linking book to Todelmer (with illuminating LEDs and everything), as well as a note in Nicole’s handwriting. She then took this outside and dropped it under a tree for a small photoshoot. This is the note that the design doc refers to as telling Dmitri how to power the retrieval arm console using the manual routing controls on the power console. If you zoom in, it says:
Retrieval Arm
End of turn 4
Kah-ntemplate the Void
The hint is that players need to replay the Eyli game that they already played, but only up to turn 4. The positions of the Kah on the center board’s 5×5 grid (the ‘Void’) will then correspond to buttons on the 5×5 grid on the power console. Activating those buttons will allow for activation of the retrieval arm/lockbox, and winning of the game.
There were a few errors at this point. First, in my haste to get everything finished, I neglected to check in the power console’s code to see if any *other* buttons in the 5×5 grid were active. This meant that turning on all of the buttons was a valid activation state (though they still couldn’t win without moving the pod to the correct location). Oops again.
The other problem was the servo locking mechanism in the retrieval arm console. On site, it didn’t like being locked. Doing so would cause it to lock up (and therefore would lock up the entire system). The current guess is that the locking hook caused it to stop moving before it reached the position it was told to move to, and it didn’t like that. We probably could have fixed the programming on-site, but in the end we just had it taped shut with a note that said “if the blue button turns on, you win”.
Without hints, the blue light never turned on. So it didn’t even matter.
The Book
As mentioned above, Riv made a nifty linking book.
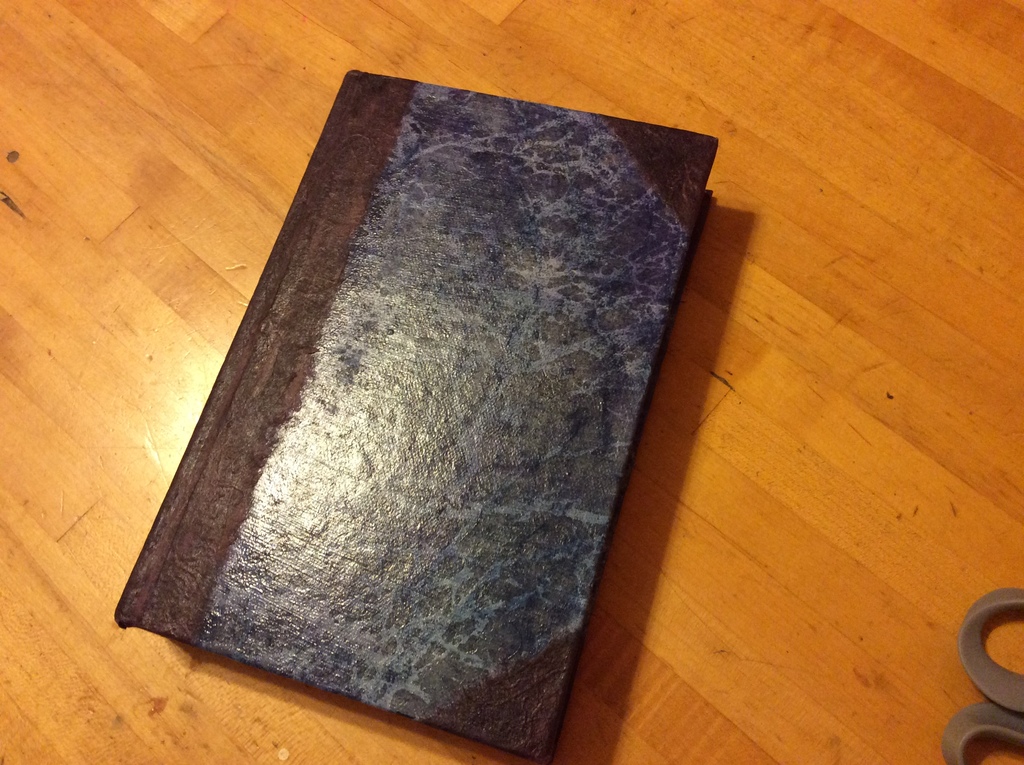
This is the view from the outside. We thought all the measurements were correct, but it turned out that it didn’t fit in the lockbox once the servo and electronics were installed >.<. Originally, we put a “coupon good for one linking book” inside the box. Once we switched to taping the box shut, we just put in a note that said “cheater!”
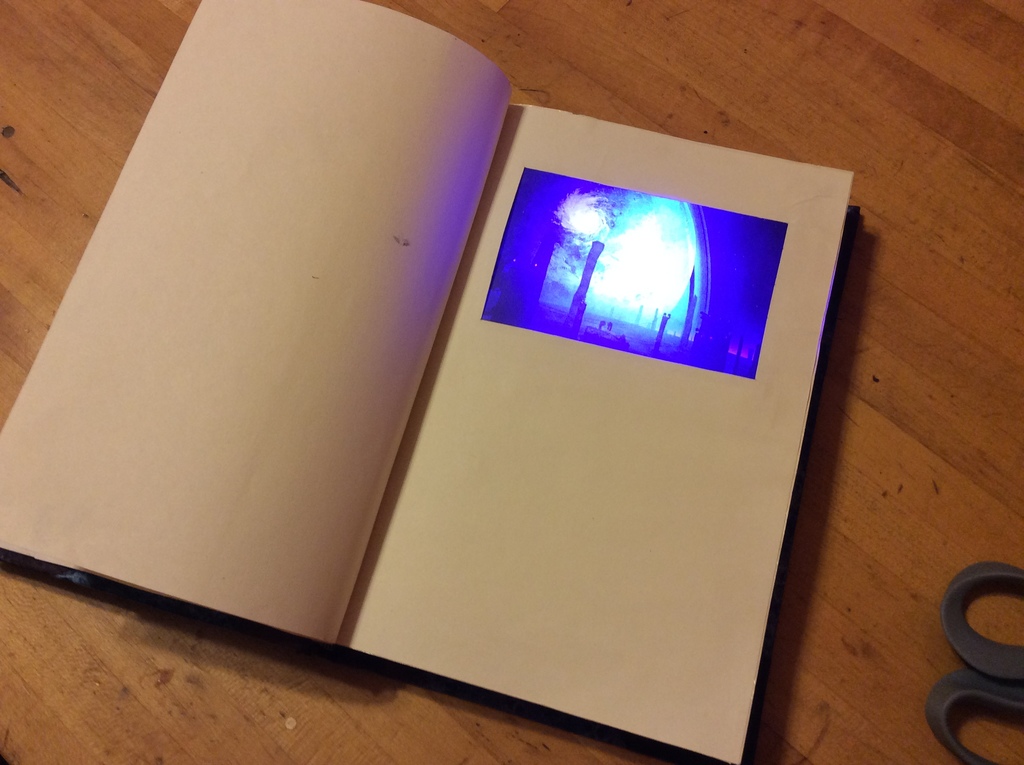
A view of the inside of the book.
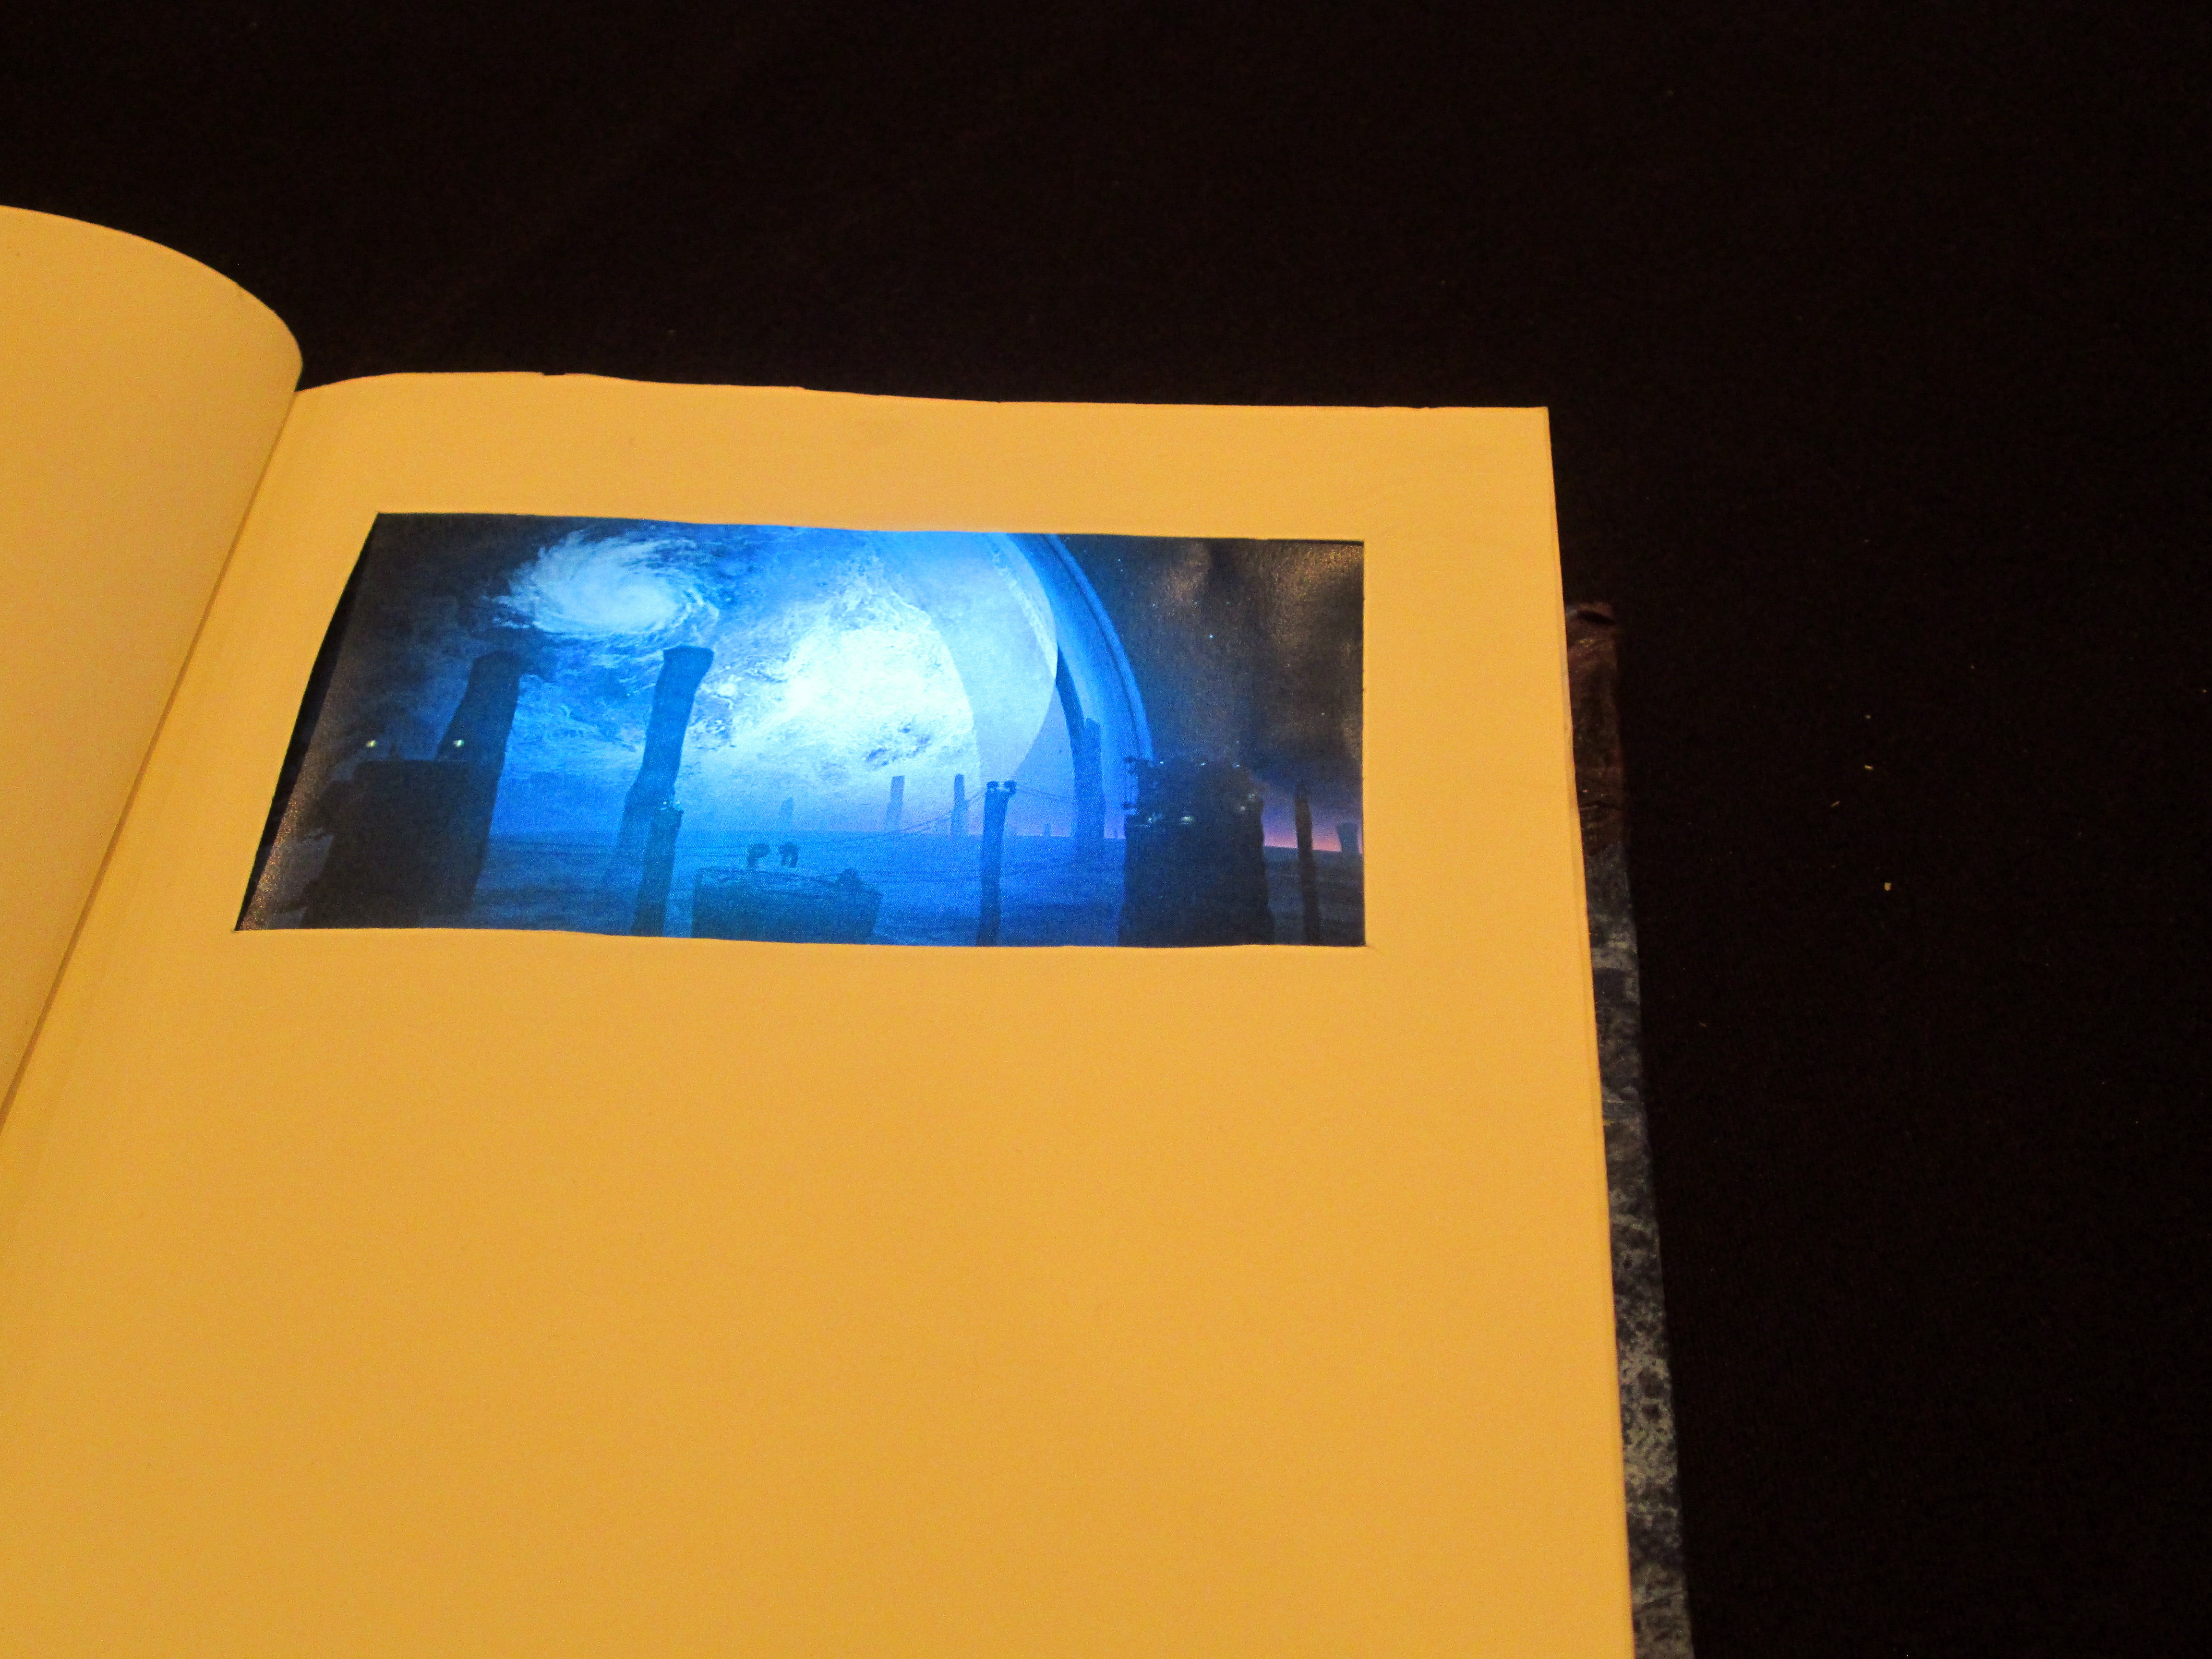
And another view. The linking panel image was designed so that it could be easily swapped out if needed in the future. Underneath it was a cavity filled with cotton batting (for diffusion) and a remote-controlled LED module to make the panel glow. It was all pretty swanky.
Conclusion
And that is how you create an Escape the Room Age game in a little over 2 months.
This was a massive undertaking. I don’t think any of us realized just how big this was going to get when we started. That said, it was a lot of fun to create, and I hope everyone that had a chance to try the game had fun playing. I’m not planning to do one for next year, but maybe in 2 or 3 years I will be up for trying this again. However, if *you* would like to do one for Mysterium some year, please submit it when the call for events is put out!
To the extent that we have any ownership over things, I am releasing the design documents to the public domain. If you should be crazy enough to want to recreate this, go ahead! All I ask is that you link back here and send us pictures!
Before anyone asks: No, I’m not going to tell you how much it all cost in the end. I couldn’t even begin to estimate the person-hours, either.
I’m sure I must have missed some aspects of the process. If you have any other questions, please comment here or feel free to drop me a line at taniith@mysterium.net.
Cheers,
-Taniith
I just read this out loud & shared with my husband as he eats his dinner before leaving for work. To say W0W! isn’t enough. He wants more time (as do I) to read it again. He thinks he would love to try to build something like this. You did a great job, all of you on putting this all together and sharing the process with all of us. Thank you again.
To all who participated in designing and realizing this puzzle, thank you and great job! It was a blast. Your hard work is most appreciated.
^.^ Thanks for the kind words to both of you!